
How to use Ideogram’s Print on Demand Studio: from niche to mockup

Print on Demand Studio puts niche research, design tools, print files, and product mockups in one workspace inside Ideogram. We took one T-shirt idea through every step.
Our test was a varsity T-shirt for a running club. We researched the niche on Amazon, generated two designs, turned “Weekend” into “Sunday” with one edit, exported a 3,333 × 3,333 pixel print file at 300 PPI, and placed it on a T-shirt mockup.
The guide below follows the same steps, with the settings we used and the credit cost each tool showed.
Overview : What Print on Demand Studio is
Print on Demand Studio is a workspace inside Ideogram for people who sell designs on T-shirts, mugs, stickers, posters, and other printed products. It opens from Print on Demand in Ideogram’s left sidebar, or at ideogram.ai/studios/print-on-demand.
The Studio’s sidebar has three views. Home shows design templates by category, trending designs, and a search box. Mockups opens the product mockup templates. Research shows what sells on Amazon. Below them, a section called Your creative toolkit lists eight tools.
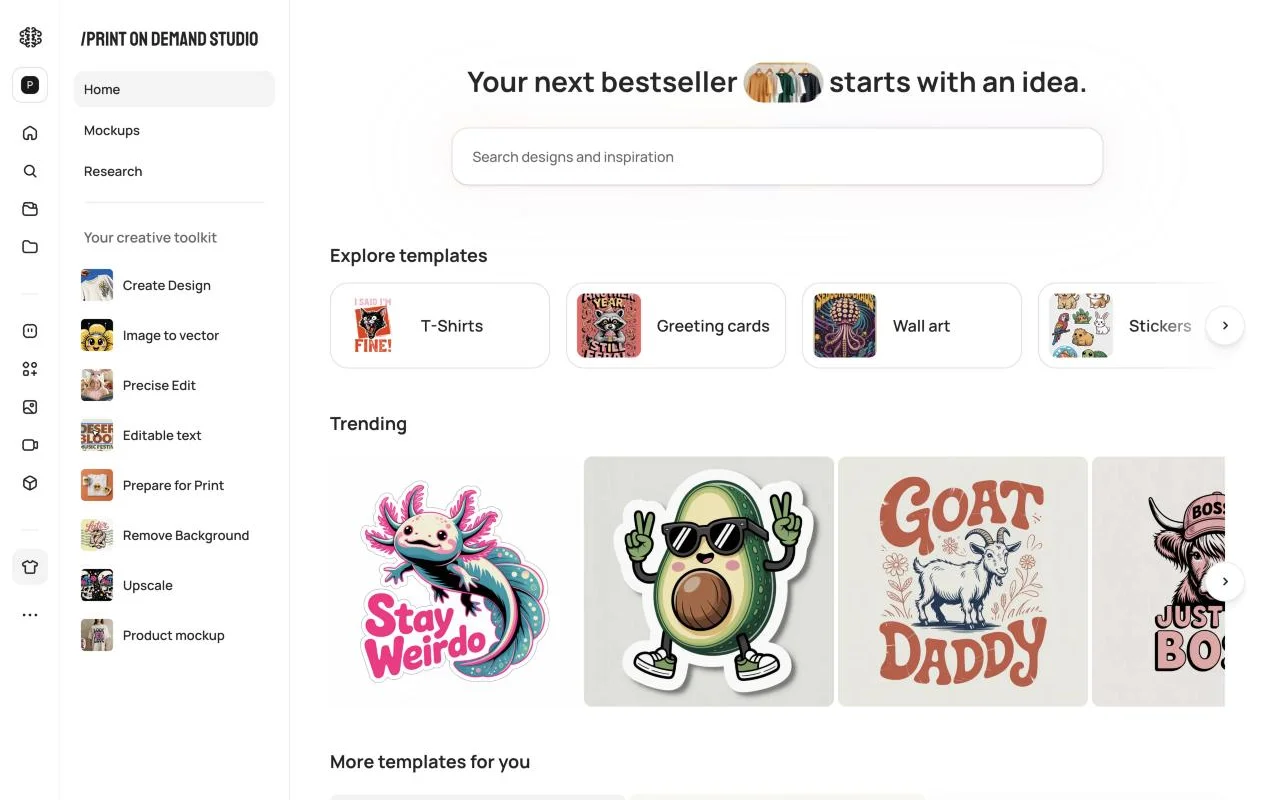
| Tool | What it does |
|---|---|
| Create Design | Generates artwork from a description, a template, or an image you upload, as a PNG or an SVG. |
| Image to vector | Converts an image into an SVG you can recolor and scale. |
| Precise Edit | Changes the part of a design you describe and keeps the rest as it was. |
| Editable text | Turns the words in a design into text layers you can retype. |
| Prepare for Print | Sizes a design for a product’s print area at 300 PPI, with upscaling and background removal. |
| Remove Background | Removes the background behind a design. |
| Upscale | Increases a design’s resolution. |
| Product mockup | Places a design on a product photo. |
Editable text and Upscale need a paid plan or purchased credits. Each tool we used showed its credit cost on its run button before we ran it.
Workflow : Take one T-shirt design from niche to mockup
We followed one idea through the Studio: a varsity T-shirt for a running club. Each step below shows what we set, what the tool showed, and what came back.
Step 1 : Research the niche
Open Research in the Studio sidebar. It has four views: Best sellers, Trending, Niche analysis, and Saved. Best sellers and Trending list Amazon print-on-demand listings with their best sellers rank (BSR), 90-day average rank, and price, and you can filter them by keyword, marketplace, product type, and date published.
Research covers seven Amazon marketplaces: the United States, United Kingdom, Germany, France, Italy, Spain, and Japan. Its product types are T-shirts, hoodies, sweatshirts, mugs, phone cases, phone grips, throw pillows, tote bags, and hats.
We ran Niche analysis for “run club” T-shirts in the United States. The report sampled 50 listings, 45 of them with a sales rank, at an average price of $19.29. It also showed benchmarks for the top-ranked listings, a sales rank distribution, and the words sellers use in their titles.
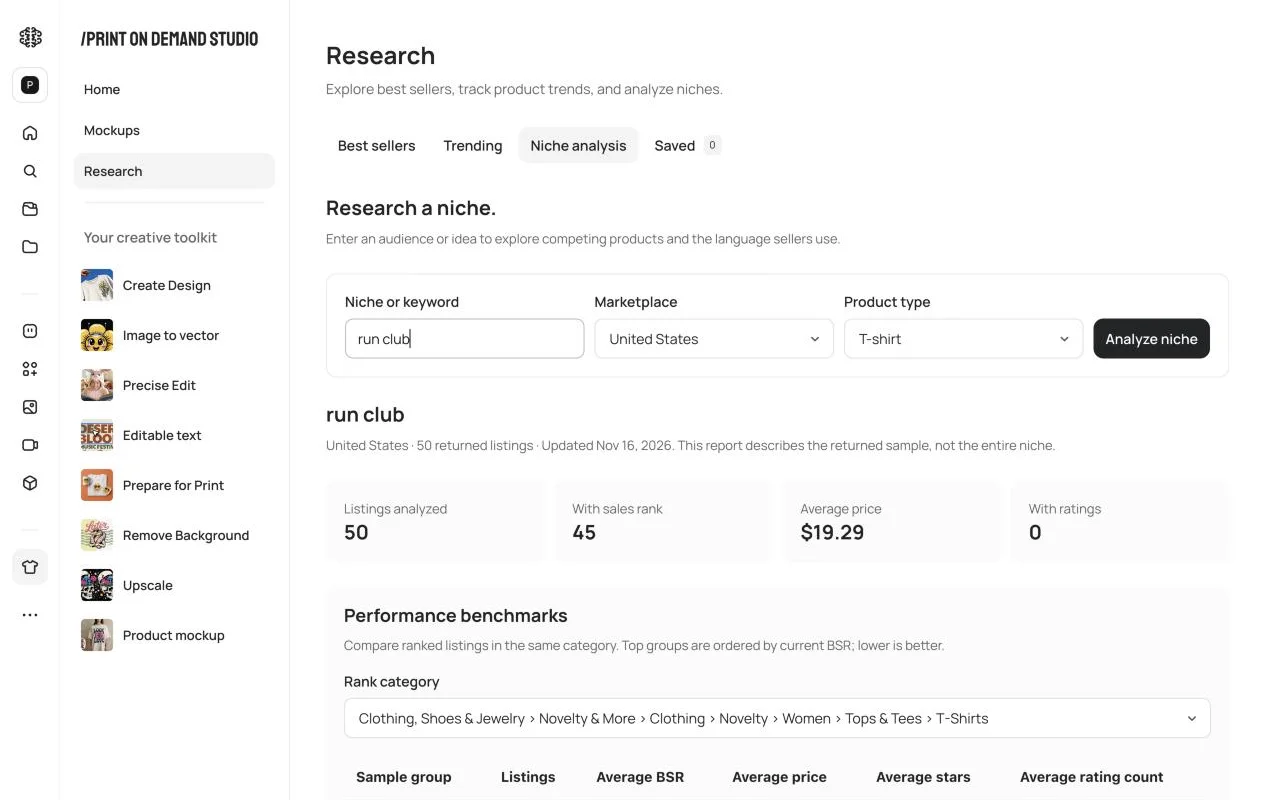
Listing keywords: The report counts how many listings contain each word and phrase. That is a count of listings, not search volume. In our report, “run club” appeared in 28 listings, “trail running” in 11, and “100 mile” in 10. Each list has a Copy button for your own titles and tags.
Variations: Each listing also has a Create a variation button, which opens Create Design with that listing’s design as the starting image. Use it to study what a niche responds to, then make artwork that is your own. The U.S. Copyright Office’s 2025 report on AI explains when AI-assisted work can be protected, and the USPTO trademark search shows whether your wording is already registered.
Plan access: Free accounts see an 8-product preview. Searching, the full results, and niche analysis need a paid plan.
Step 2 : Create the design
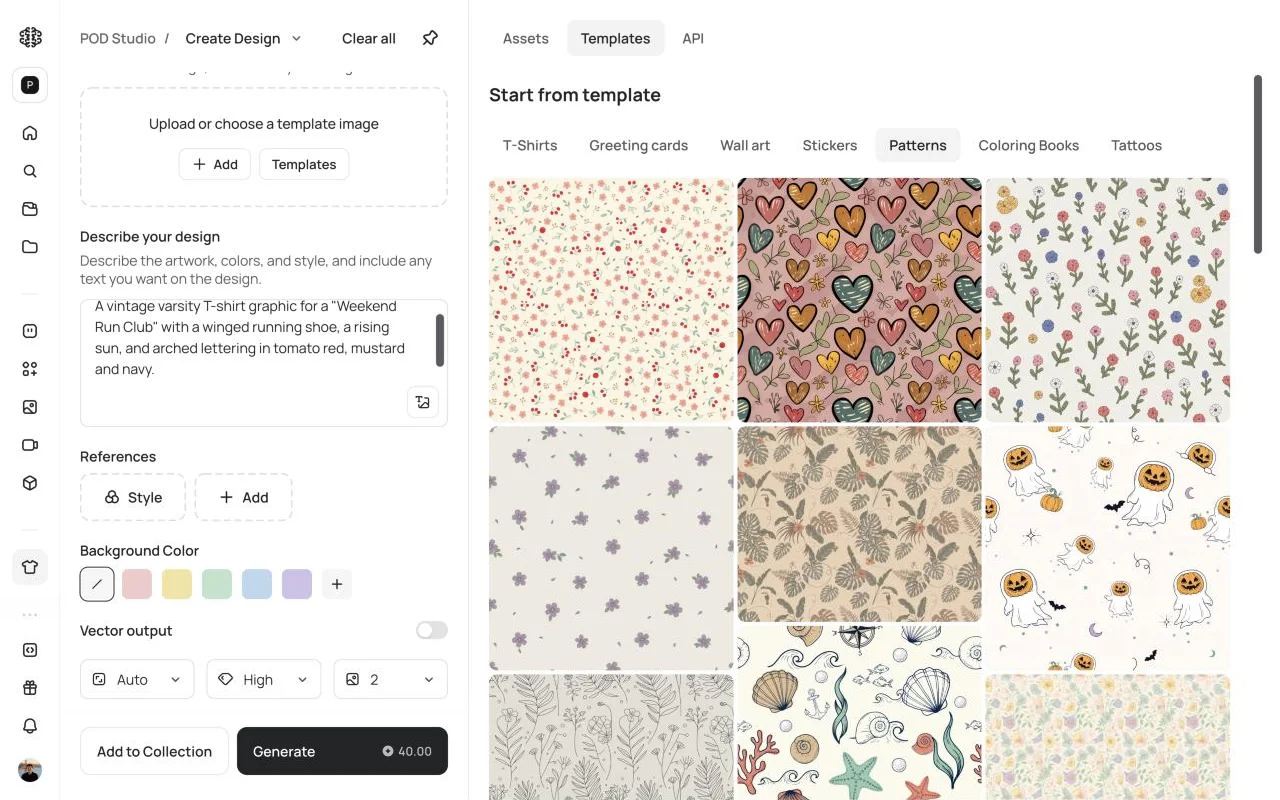
Open Create Design from the toolkit. You can start from a template, an image you upload, or a description alone. Templates come in seven categories: T-shirts, greeting cards, wall art, stickers, patterns, coloring books, and tattoos.
Describe the artwork, colors, and style, and include the words you want on the design. The panel’s own example puts them in quotation marks, and so did we. Ideogram’s text rendering draws those words as part of the artwork, and the help center’s guide to text in images covers how to write them into a prompt.
You can add reference images and a style image, pick a background color, and switch on vector output to get an SVG, the format our editable SVG guide covers. The last row sets the aspect ratio, the quality, and the number of images.
A vintage varsity T-shirt graphic for a “Weekend Run Club” with a winged running shoe, a rising sun, and arched lettering in tomato red, mustard and navy.
We left the aspect ratio on Auto, kept the quality on High, the default on paid plans, and asked for two images. The Generate button showed 40 credits.
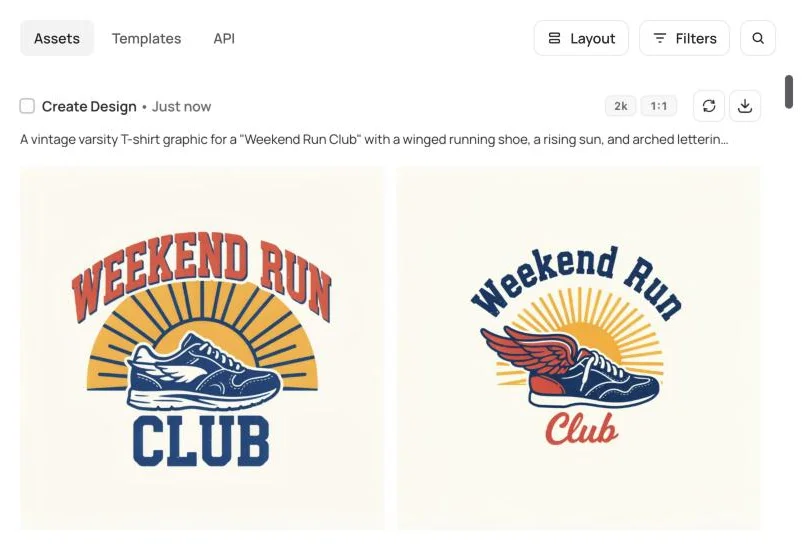
Both designs spelled “Weekend Run Club” correctly and kept the three colors we asked for. We took the arched varsity version forward.
For other ways to make apparel artwork, see our comparison of the best AI tools for T-shirt design.
Step 3 : Make a variant with Precise Edit
One design can become several listings with a different day, city, or name. Every result in the Studio has a Use menu whose More list sends it to any of the eight tools, so we sent the design to Precise Edit and described the change.
Change the words “WEEKEND RUN” to “SUNDAY RUN”. Keep the same arched varsity lettering, colors and everything else.
The edit showed 6 credits. It replaced “Weekend” with “Sunday” in the same red varsity letters and left the sunburst, the shoe, the CLUB lettering, and the colors as they were.

Before: Weekend Run Club

After: Sunday Run Club
The same kind of edit corrects a misspelled word, as our guide to fixing misspelled words in an AI image shows.
Editable text: The Studio also has Editable text, which turns a design’s words into text layers you can retype. It accepts up to five font files for the fonts a design uses. Lettering drawn by the model, like this varsity type, has no font file, so we made the change with Precise Edit and checked the result against the original. Our comparison of AI tools for editing text in images covers other approaches.
Step 4 : Prepare the print file
Send the final design to Prepare for Print and choose the product and its print area. For a T-shirt, the print areas run from a 4 × 4 in chest crest to 16.7 × 18.3 in, and each lists its pixel size at 300 PPI. The other products are sweatshirts, mugs, stickers, mouse pads, and listing photos.
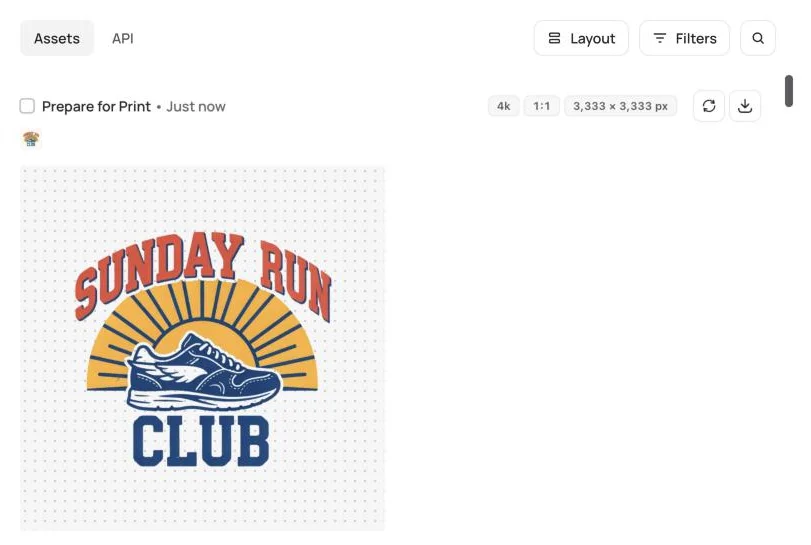
The panel previews where the design sits on the product and works out what the file needs. Our design was 2,048 × 2,048 pixels. In the 11.1 × 13.3 in print area, the square design prints at 11.11 × 11.11 in, which takes a 3,333 × 3,333 pixel file at 300 PPI, so the panel called for a 2× upscale. The Remove design background switch was on, and the output was set to Artwork only, which is the artwork at its print size with no space around it.
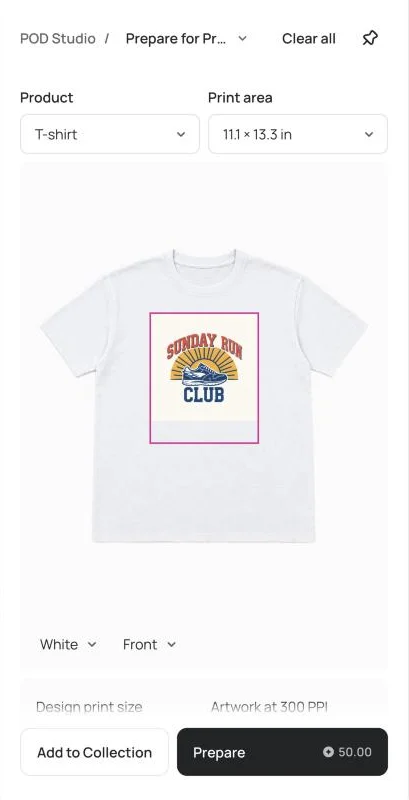
Product and print area
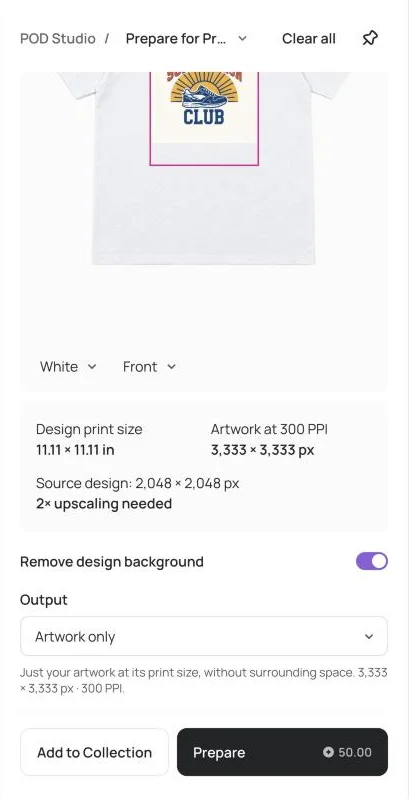
Print size and output
Prepare showed 50 credits at this size. The larger 15 × 18 in print area needed a 4× upscale and showed 200 credits, so check the print area your provider asks for before you choose one. A design that needs no upscaling and no background removal is formatted at no charge.
Each print provider sets its own print areas and resolution. Printful’s print-file guide, for example, recommends PNG for apparel designs with a transparent background and files of 150 to 300 DPI, depending on the product. A 300 PPI file from Prepare for Print sits at the top of that range.
Step 5 : Make the listing mockup
Send the prepared file to Product mockup and pick a photo from the mockup templates, or upload your own. The template library has 22 product categories, including T-shirts, hoodies, sweatshirts, phone cases, tote bags, mugs, posters, stickers, pillows, blankets, and hats.
You can add a note about the scene, such as a lighting or angle change, and set a product color. We chose a photo of a white T-shirt and left both blank. The Generate button showed 3 credits.
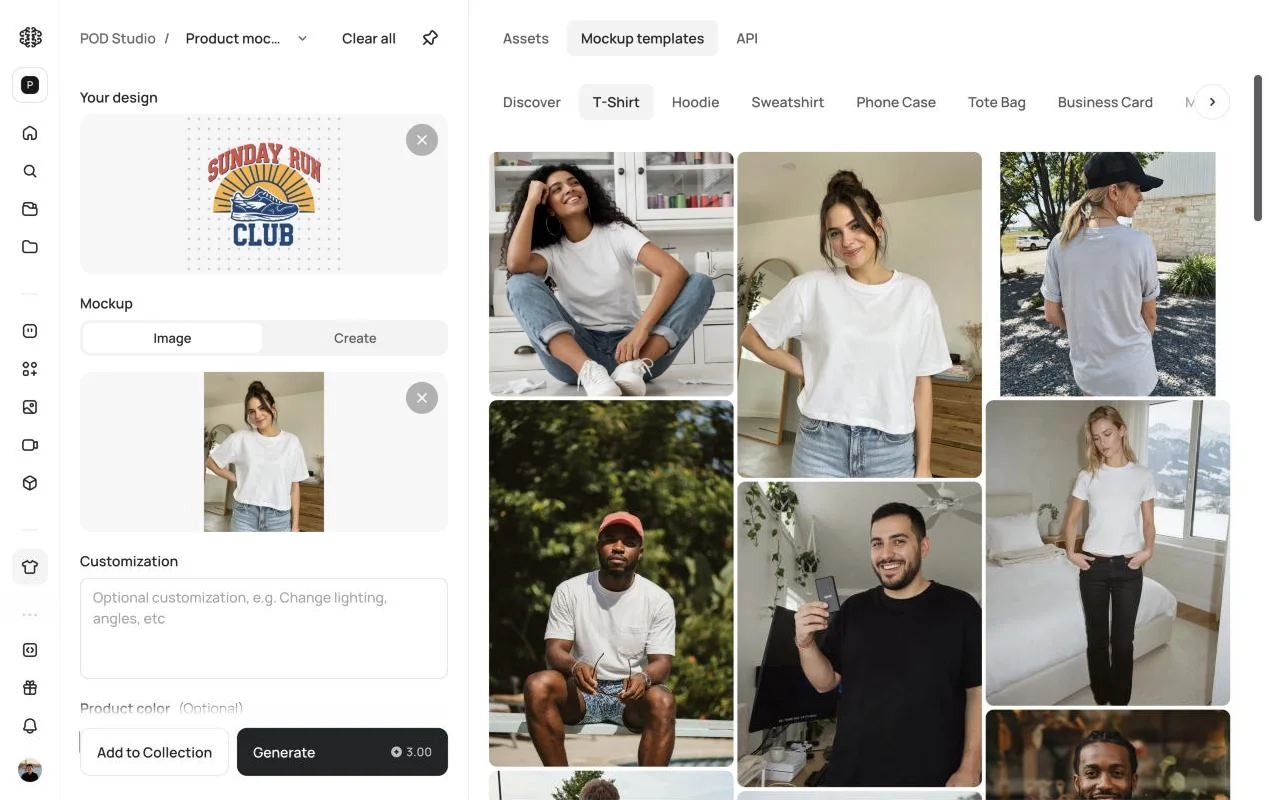
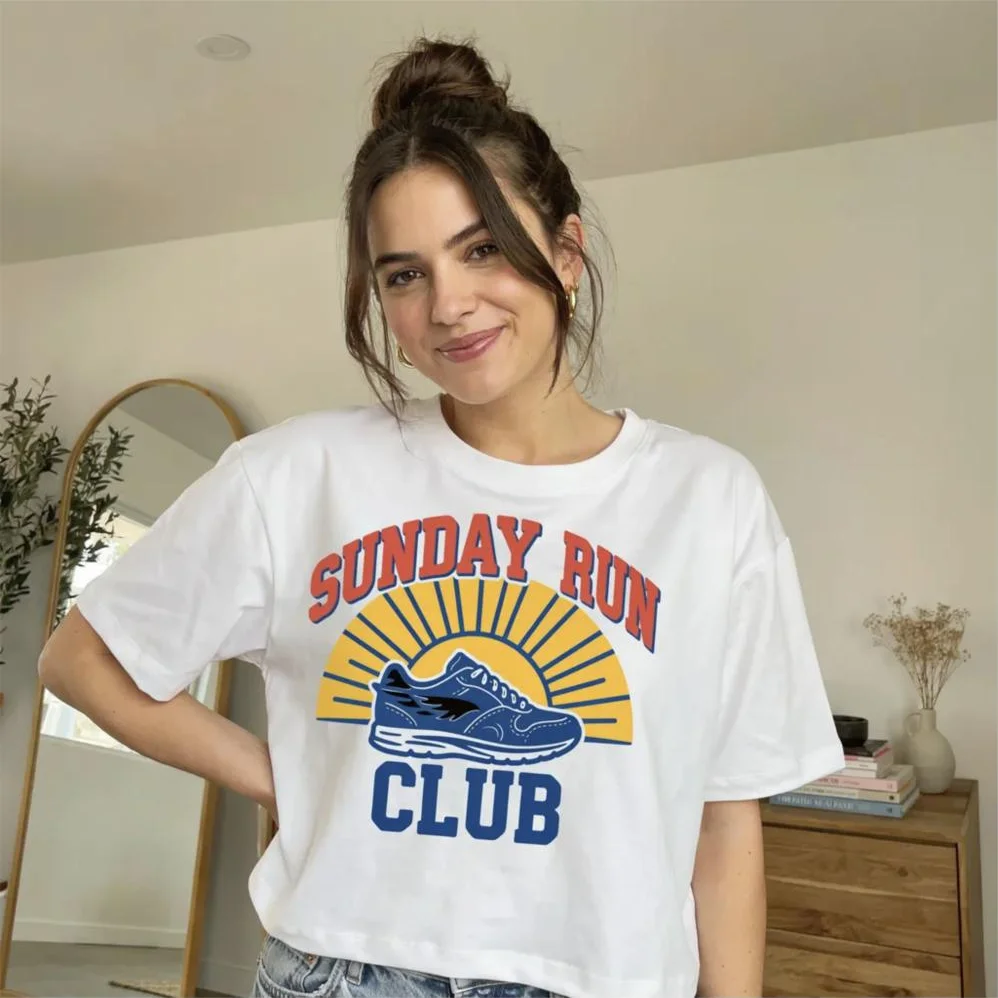
The mockup follows the shirt’s folds and the model’s pose. It redraws the design onto the photo, so compare small details with your print file before you use the image in a listing.
To show the shirt in more colors, Colorways changes a product’s color in a photo. Our comparison of AI mockup generators covers other ways to build listing images.
Step 6 : Download the files and list the product
Download the print file and the mockup from each result’s download button; the help center lists the download options. Upload the print file to your print provider and the mockup to your product listing. The Studio does not print, ship, or publish listings, so those stay with the provider and marketplace you already use.
The steps in this guide used 99 credits:
| Step | Credits shown |
|---|---|
| Create Design, two images at High | 40 |
| Precise Edit, one wording change | 6 |
| Prepare for Print, 11.1 × 13.3 in T-shirt | 50 |
| Product mockup, one image | 3 |
| Total | 99 |
Why it helps : Why the Studio fits a print-on-demand workflow
A print-on-demand listing needs a niche, a design, a file the printer accepts, and an image that sells the product. The Studio keeps all four in one place, and each part answers a specific problem.
Research sits beside design: Niche analysis shows the price range, the ranks, and the words other listings use, one click from Create Design. You can write the design brief with the phrases a niche already uses.
Text is part of the design: Ideogram draws the words in a design as part of the artwork. In our test, both designs spelled “Weekend Run Club” correctly. The phrase is often what a buyer pays for, so check the spelling on every result before you prepare a print file.
Variants take one edit: Our Sunday version took one edit at 6 credits, with the lettering, layout, and colors unchanged. A seller can test a design across days, cities, or names without starting again.
Files come out at print size: Prepare for Print does the 300 PPI arithmetic, the upscale, and the background removal in one step, and it shows the cost before it runs.
Results move between tools: Each result’s Use menu lists every Studio tool under More, so the design went from Create Design to Precise Edit, Prepare for Print, and Product mockup without a download or an upload in between.
For more on the design side, read our print-on-demand design guide, compare AI tools for print-on-demand, or see Ideogram’s print-on-demand features.
Reference : FAQs
What is Ideogram’s Print on Demand Studio?
Print on Demand Studio is a workspace inside Ideogram for people who sell designs on printed products. It brings together Amazon niche research, design templates, eight design tools, print-file preparation, and product mockups.
Where do I find Print on Demand Studio?
Select Print on Demand in Ideogram’s left sidebar. The Studio opens on its home view, and its own sidebar links to Mockups, Research, and the eight tools.
Do I need a paid plan to use the Studio?
Research’s search, full results, and niche analysis need a paid plan; free accounts see an 8-product preview. Editable text and Upscale need a paid plan or purchased credits. The other tools run on credits, and each one we used showed its cost before we ran it. Our pricing page lists the current plans, and the help center’s plan guide describes each one.
What file does Prepare for Print create?
It creates a PNG sized to the print area you choose, at 300 PPI. The listing photo option creates a JPG. Our T-shirt file was 3,333 × 3,333 pixels with a transparent background.
Which marketplaces does Research cover?
Research covers Amazon in the United States, United Kingdom, Germany, France, Italy, Spain, and Japan. You can search one marketplace or all seven at once.
Does the Studio print or ship products?
No. The Studio prepares designs, print files, and mockups. Printing, shipping, and storefront listings stay with your print-on-demand provider and marketplace, so check their file requirements before you upload.
Can I use artwork I already have?
Yes. Upload an image as Create Design’s starting image, or send any image in your Ideogram assets to a Studio tool from its Use menu, under More.
Take your next design from niche to mockup
Open Print on Demand Studio in Ideogram and run your own idea through research, design, print prep, and a mockup.