
How-to guide
How to Turn a Photo Into a Painting or Illustration With AI
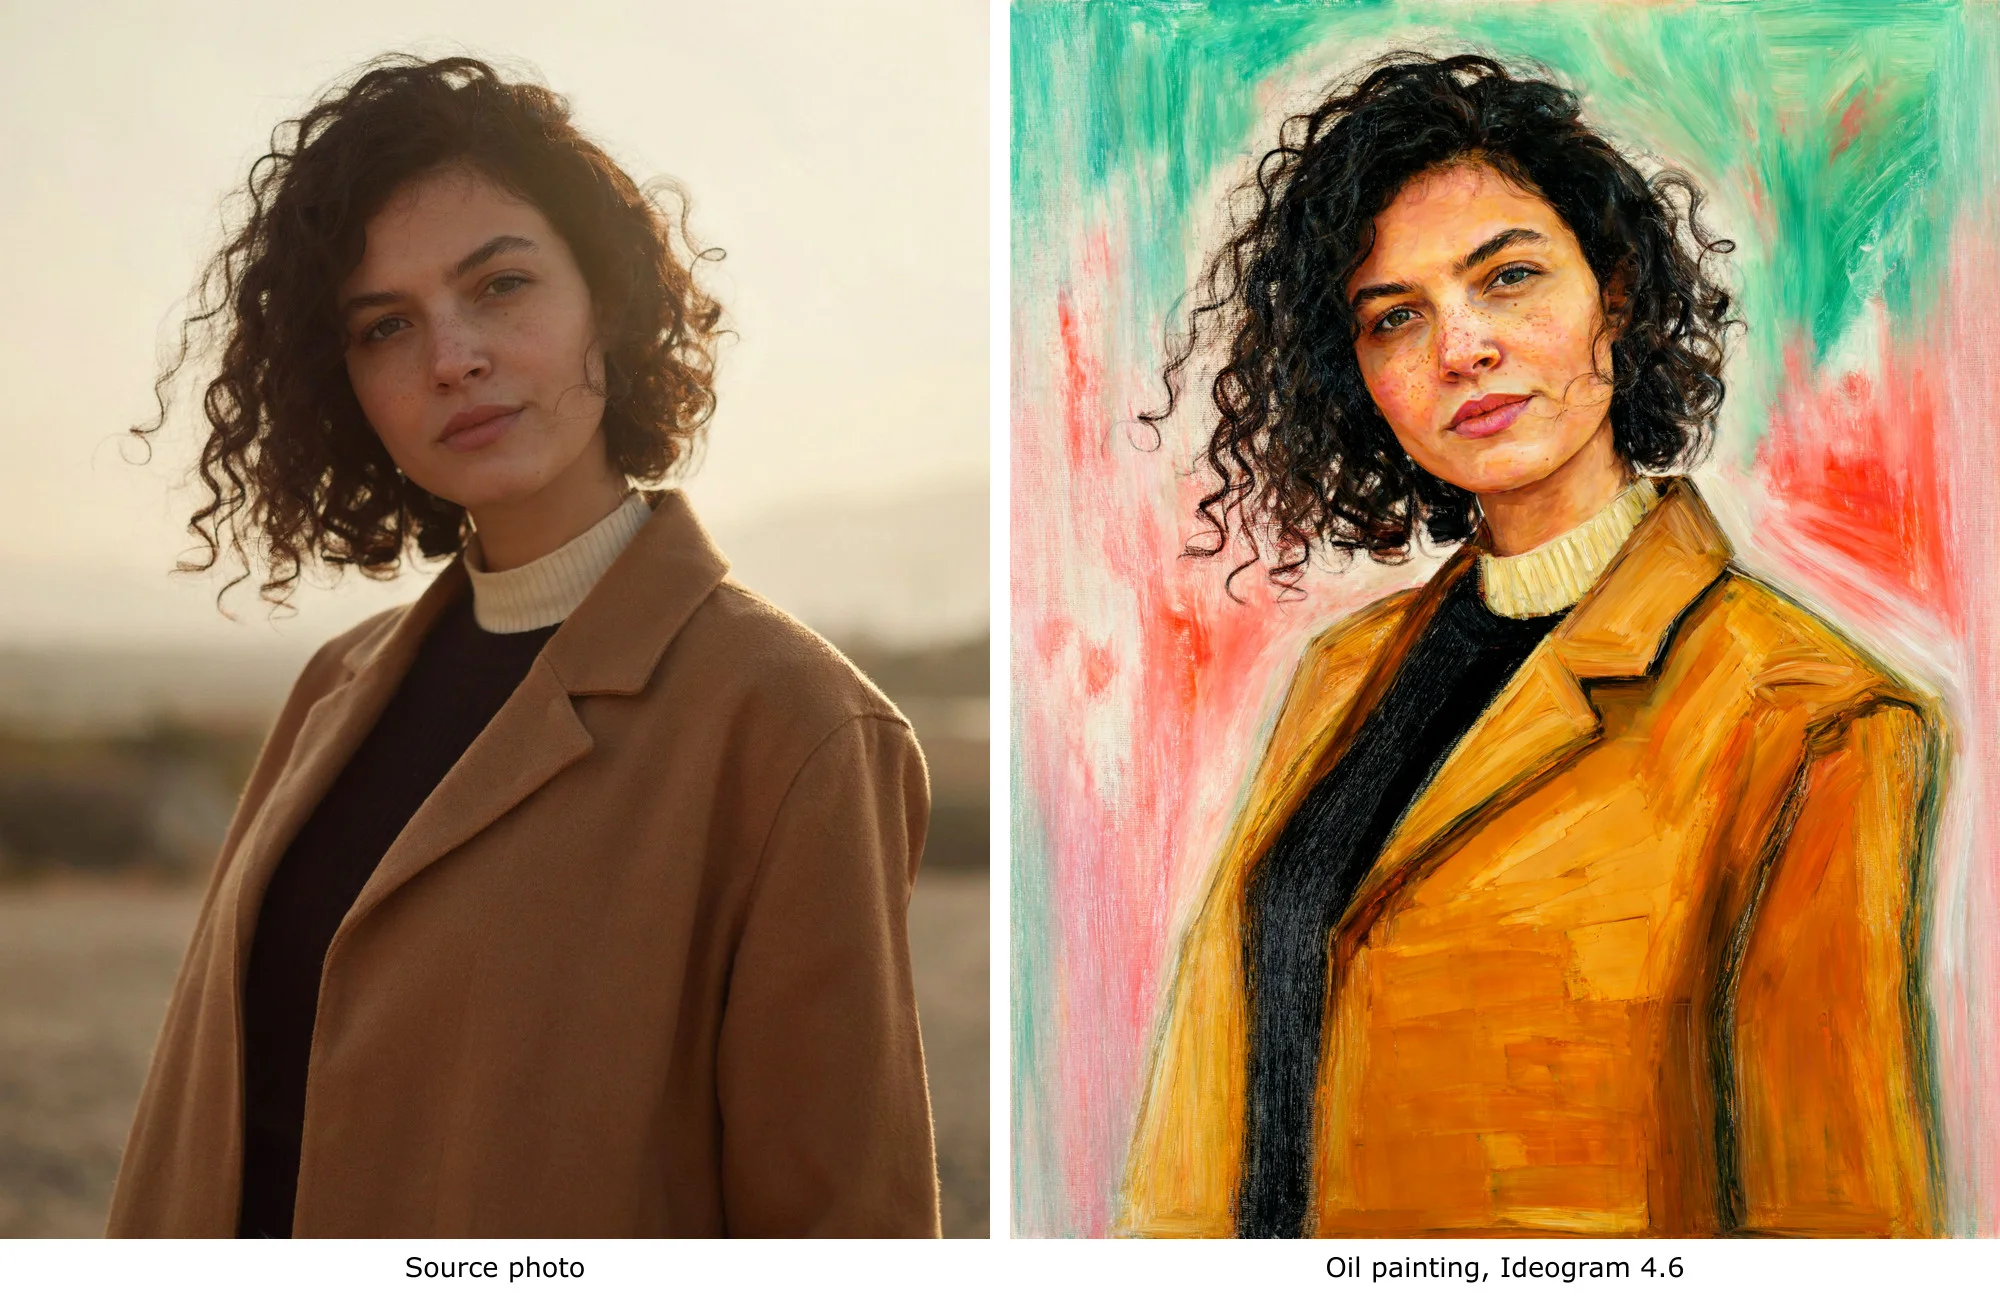
A paint filter doesn’t turn a photo into a painting. It lays texture over the same pixels, so it still reads as a photo. To turn a photo into a painting with AI, give an image model the photo and name the medium, the surface, and what has to stay the same.
We did that with one portrait in Ideogram and got a thick-impasto oil, a loose watercolor, and an old-master panel, all clearly the same woman. If your last try changed the face or came out too small to print, here’s the prompt and the settings that fix both.
Overview: The short version: an AI painting from a photo in five steps
- Start with a sharp, well-lit photo.
- Add it to Ideogram as a reference image.
- Write a prompt that names the medium, the surface, and the marks, then lists what to keep.
- Set the quality to High. Choose 2K for a first try or 4K if you plan to print larger.
- Generate, pick the result you like, and download it.
Guide: Turn a photo into a painting with AI, step by step
We ran every example below in Ideogram 4.6 on a Pro plan.
1. Choose a photo the painting can hold on to
Pick a photo with one clear subject, even light, and sharp focus. All five of our source photos, which we also generated in Ideogram, fit that: a candid portrait, a woman in a wildflower meadow, a man in a hat, a stretch of sea cliffs, and a woman holding a bouquet. Each one came back with its subject intact.
Use a photo you have the rights to. For a photo of someone else, get their permission first.
2. Add the photo as a reference image
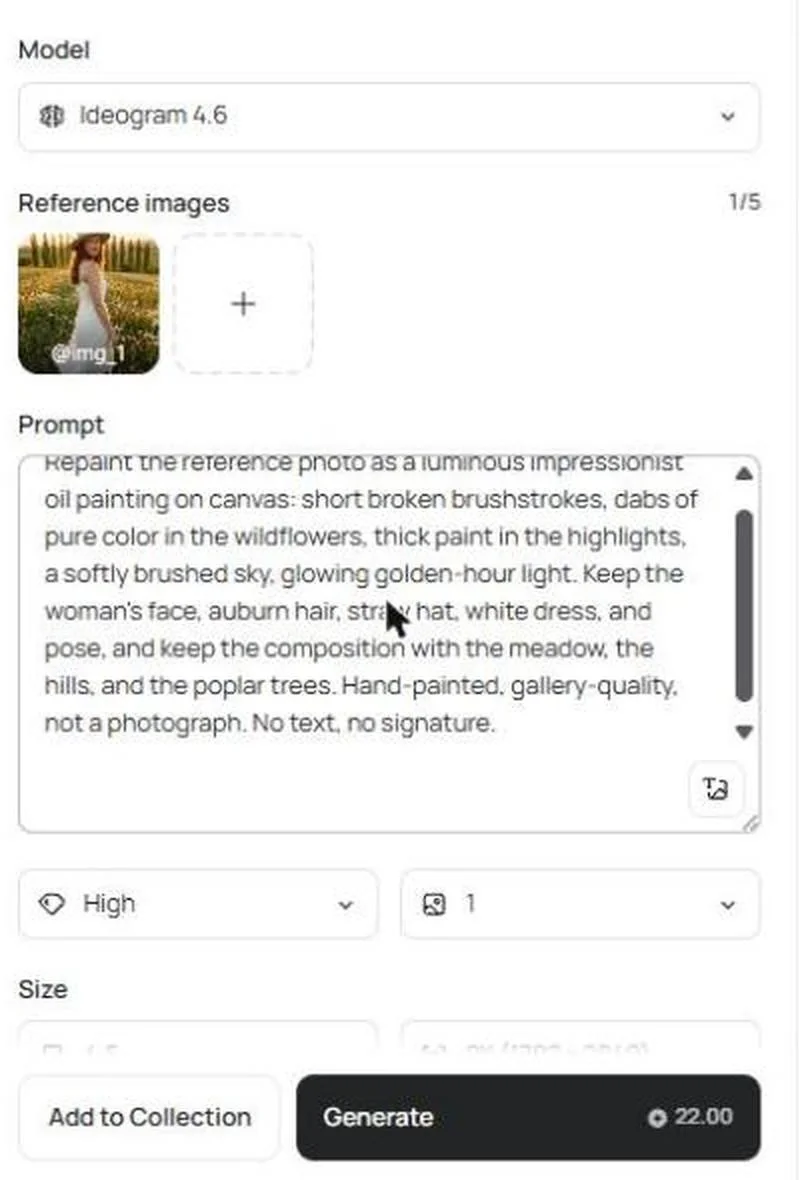
Sign in at ideogram.ai, open the Image app from the left menu, and choose Ideogram 4.6 in the model picker. Under Reference images, click the plus sign and upload your photo, or pick one from your library. Ideogram 4.6 accepts up to five, and one is enough here. See how reference images work in Ideogram.
3. Write the prompt: medium, surface, marks, then what to keep
“Make this a painting” leaves the medium, the surface, and the brushwork to chance. Our prompt had four parts:
- Medium: “an expressive contemporary oil portrait”
- Surface: “on canvas”
- Marks: “thick impasto, bold palette-knife strokes, every brushstroke visible”
- What to keep: “her exact face, features, freckles, curly dark hair, expression, pose, and framing”
This is the full prompt behind the oil portrait above:
Repaint the reference photo as an expressive contemporary oil portrait on canvas: thick impasto, bold palette-knife strokes, every brushstroke visible, raised layered paint, loose confident edges. Replace the plain backdrop with a loosely brushed background of teal, coral, and soft pink. Warm ochre and camel in the coat, cream in the turtleneck. Keep her exact face, features, freckles, curly dark hair, expression, pose, and framing so she is clearly the same person. Gallery-quality hand-painted artwork, not a photograph. No text, no signature.
We wrote every prompt as full sentences in that order. For other subjects, see how to structure an Ideogram prompt.
4. Set quality to High and pick a size
Choose 2K for a first try or 4K if you plan to print larger. For the portrait, we set quality to High, one image per run, and 4K. Our portrait paintings came back at 3584 × 4480 pixels. On our Pro plan, a 4K High run with a reference image cost 60 credits, and the same run at 2K cost 22. Without a reference image, a 4K High image costs 20 credits. We ran the meadow, hat, coast, and bouquet examples at 2K. The Generate button shows the cost before you click.
5. Generate, then change one thing at a time
Every painting shown here is the first result from its prompt. If yours needs a change, keep the image and ask for one edit, such as warmer light or a simpler background. In Ideogram 4.6, each edit can use the previous result as its source, so you don’t start the scene over.
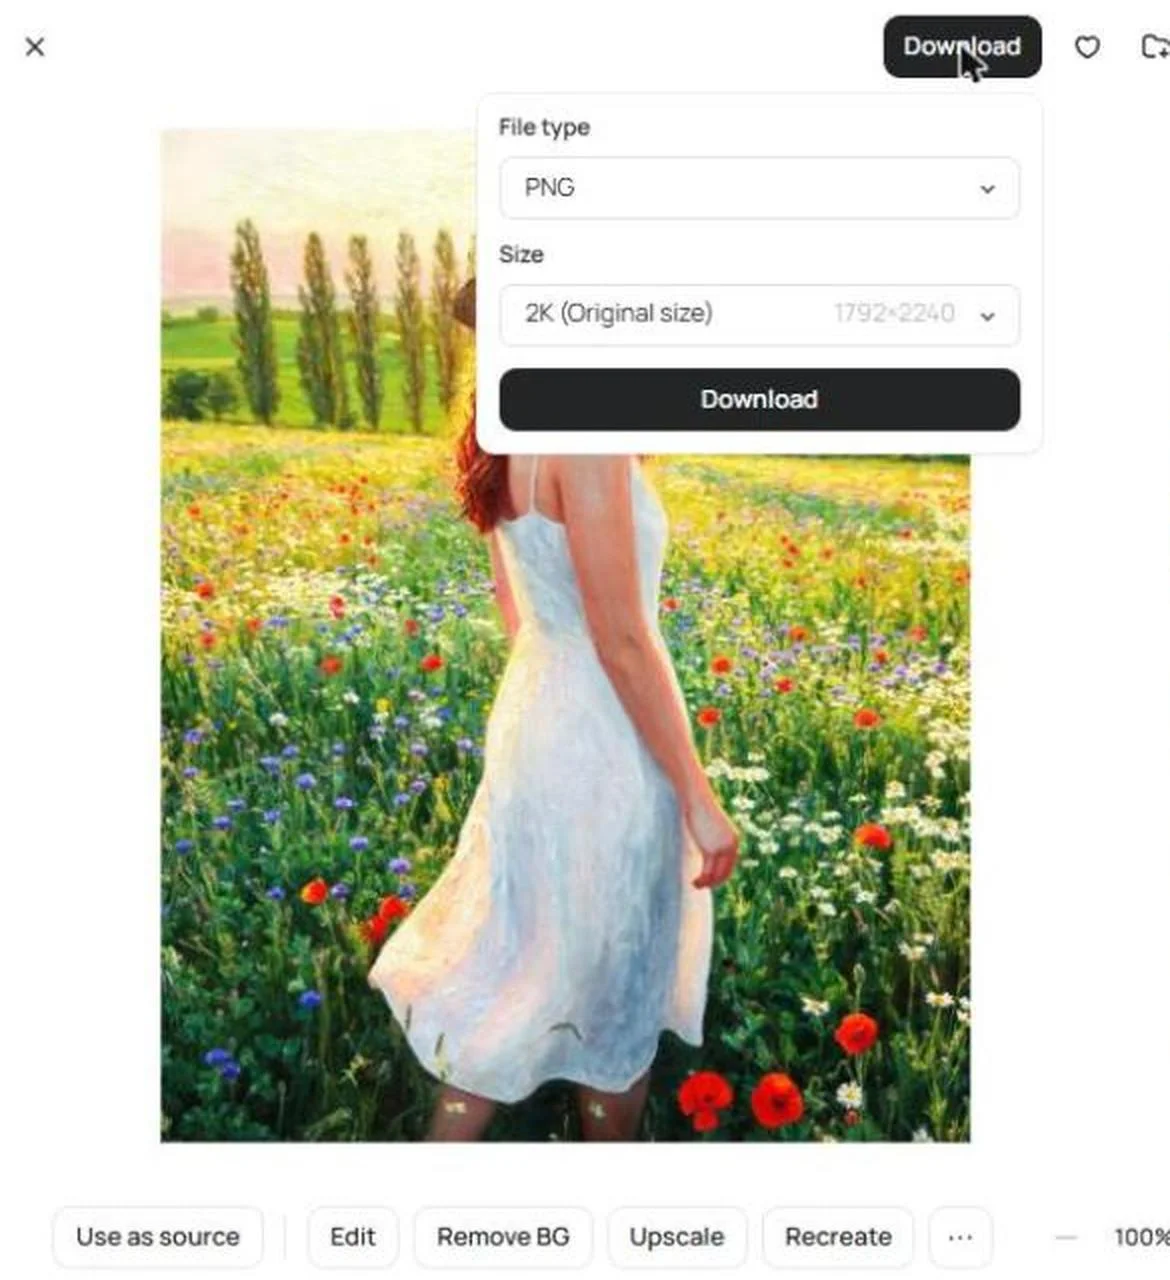
To save the painting, open it, click Download, and choose the file type and size.
Guide: How to make a photo look like a painting, not a filter
Two prompt choices decided how painterly our results came out.
Give the paint somewhere to go: a prompt that told the model to keep every object exactly in place gave us a neat, precise watercolor that stayed close to the photo. The loosest results came from prompts that also changed something. On the portrait, we replaced the backdrop with brushed color for the oil, and let the washes fade into bare white paper for the watercolor. The subject stayed fixed, and everything around it was free to be paint.
Name the marks, not just the medium: “watercolor” alone is a color treatment. “Wet-on-wet blooms, soft bleeding edges, pigment drips” describes what a brush does, and that is what showed up in the result.
A reference image or Remix: how much do you want changed?
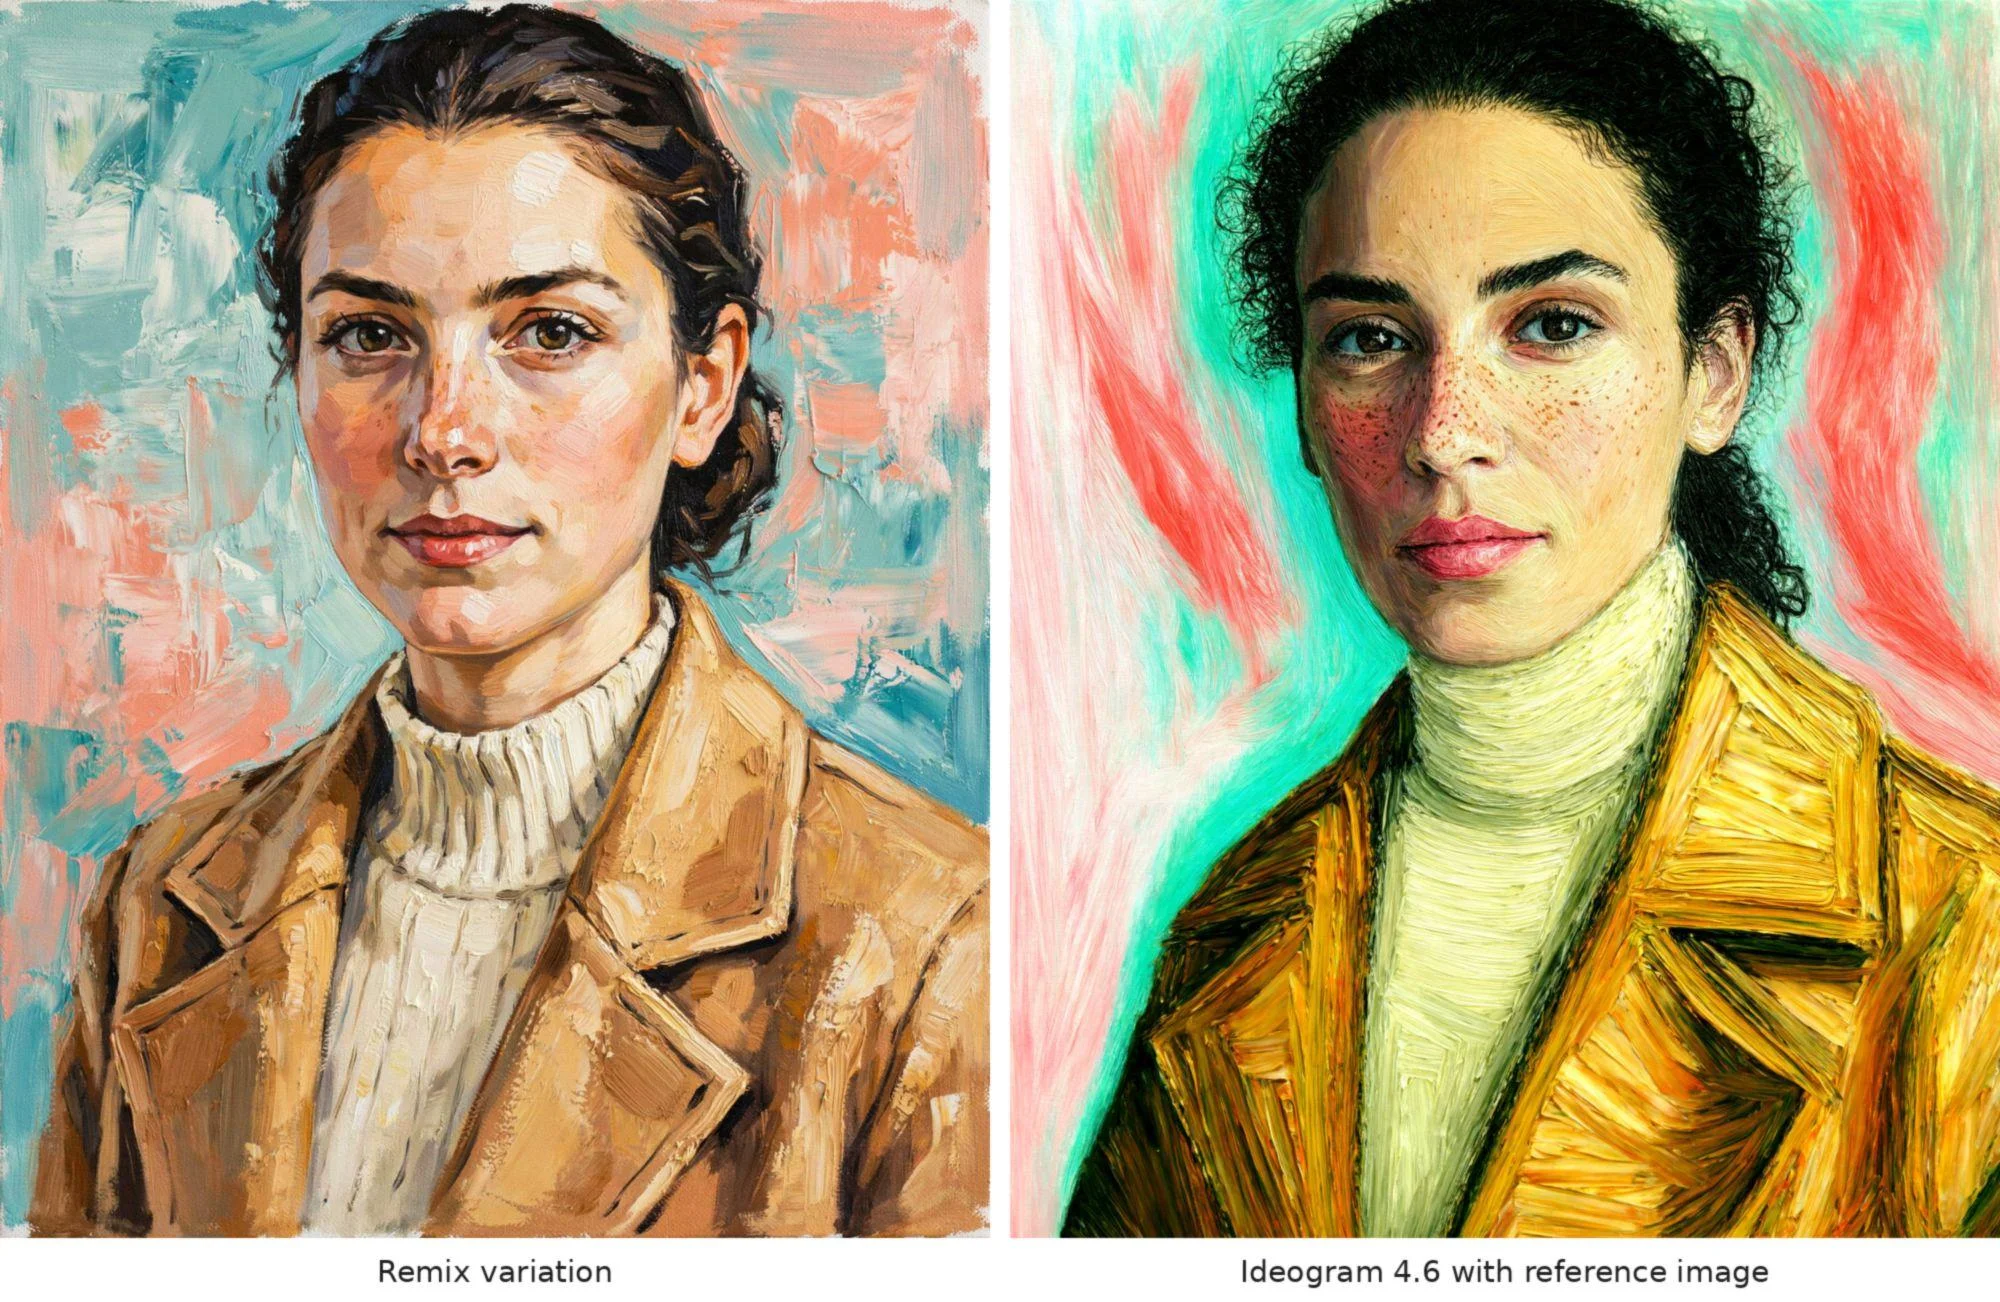
Ideogram has two ways to start from a photo. We ran the same portrait through both.
| Ideogram 4.6 with a reference image | Remix | |
|---|---|---|
| What it does | Repaints your photo and holds the subject | Creates new variations inspired by your photo |
| Our portrait | Same face, freckles, and pose | A fresh take: bold painted look with restyled features and knitwear |
| Output in our test | 3584 × 4480 | 1792 × 2240 |
| Credits on our plan | 60 for one 4K image | 24 for four images |
| Use it when | The person, pet, or product must stay recognizable | You want several new takes on the photo to choose from |
Ideogram Remix has a Strength setting, and higher strength keeps more of your source image. We left it on Auto, which picked Ideogram 4.0 and an image weight of 25. In our portrait test, Ideogram 4.6 with a reference image kept the likeness closer than Remix on Auto.
Guide: Prompts by style: oil, watercolor, impressionist, and palette knife
The first three paintings below started from the same portrait photo. Only the prompt changed.
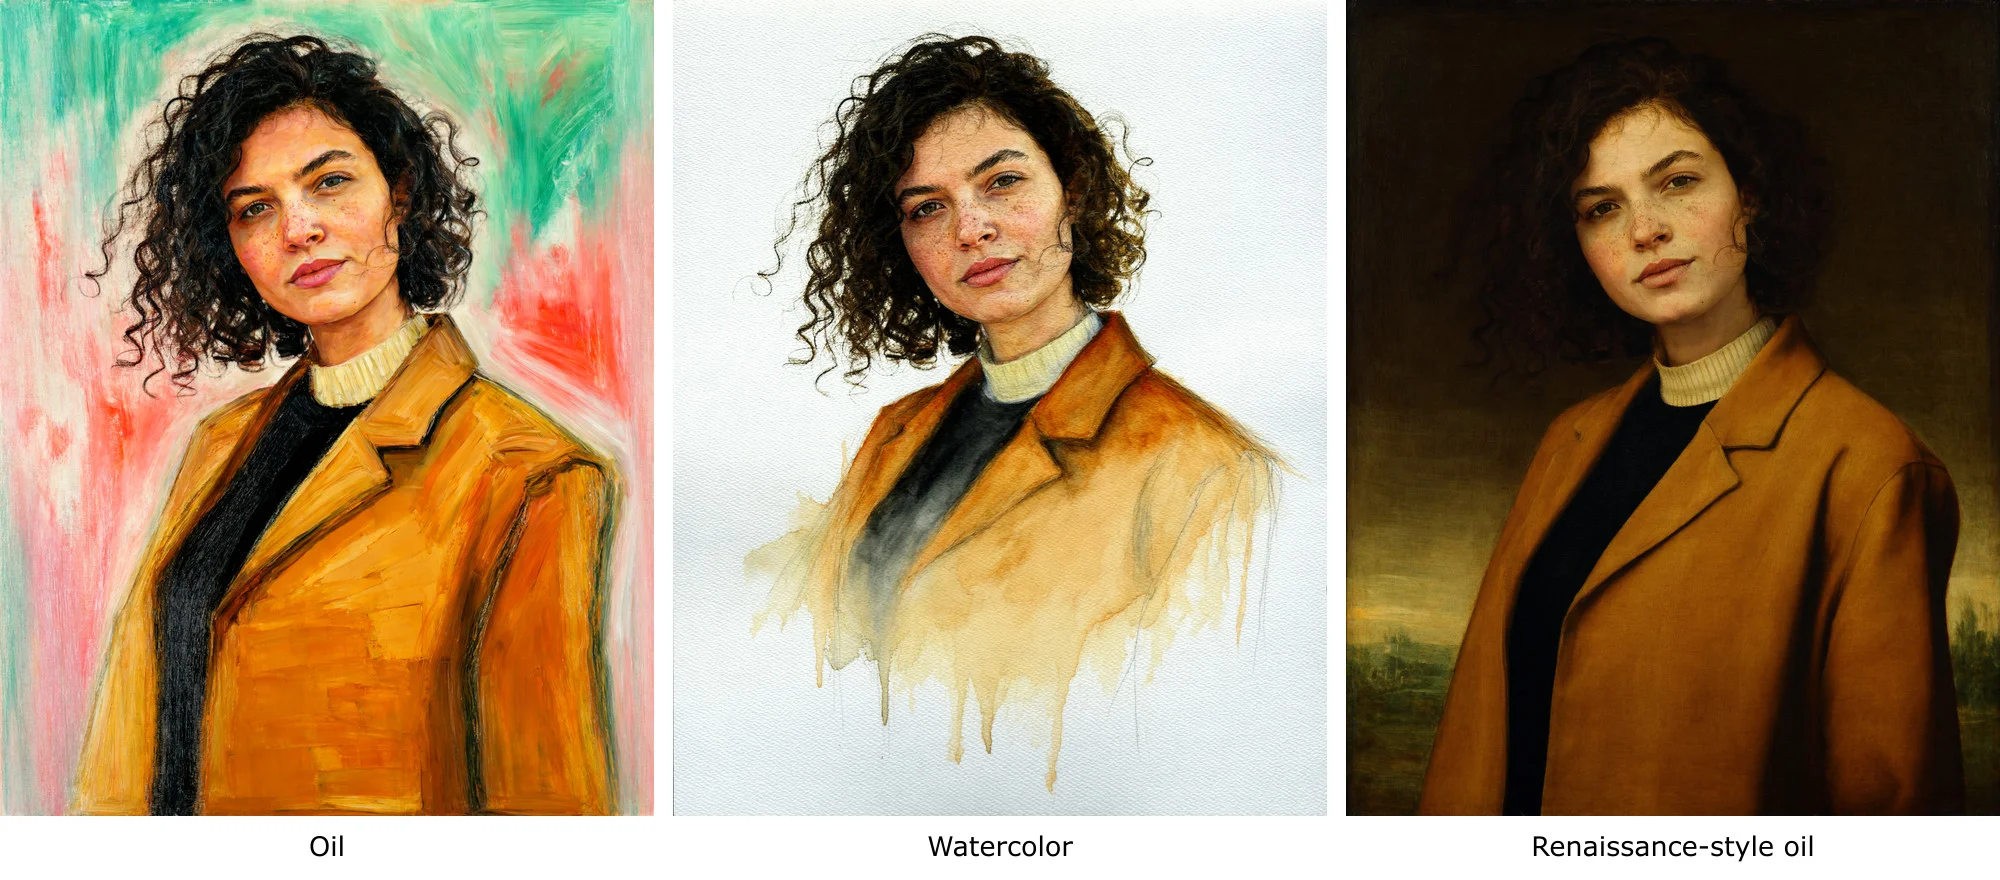
Oil
The prompt is the one in step 3. The paint sits in thick ridges on the coat, the background is loose teal and coral, and the freckles are where they were in the photo.
Watercolor
Repaint the reference photo as a loose fine-art watercolor portrait on white cold-press paper: transparent washes, wet-on-wet blooms, soft bleeding edges, pigment drips and splashes fading into bare white paper around the shoulders, a few light pencil lines showing through. Remove the backdrop so the portrait sits on white paper. Camel and ochre washes in the coat, warm skin tones. Keep her exact face, features, freckles, curly dark hair, expression, and pose so she is clearly the same person. Hand-painted, not a photograph. No text, no signature.
The coat dissolves into drips at the bottom edge and the face stays precise. Because the portrait sits on bare white paper, it drops onto a card, an invitation, or a white page without a visible edge.
A classical, Renaissance-style portrait
Repaint the reference photo as a classical Renaissance-style oil portrait: smooth glazed oil on a wood panel, soft sfumato modeling, warm candle-like light from the left, deep umber background with a faint distant landscape, fine craquelure, rich earth pigments with touches of gold ochre. Keep her exact face, features, freckles, curly dark hair, expression, pose, and the camel coat and cream collar so she is clearly the same person. Museum-quality old-master painting, not a photograph. No text, no signature.
The result has a dark umber ground, a small landscape behind her shoulder, and soft, glazed skin. The prompt never names a painter. Sfumato, glazing, and craquelure tell the model what to paint, and describing technique keeps you from copying a living artist’s style.
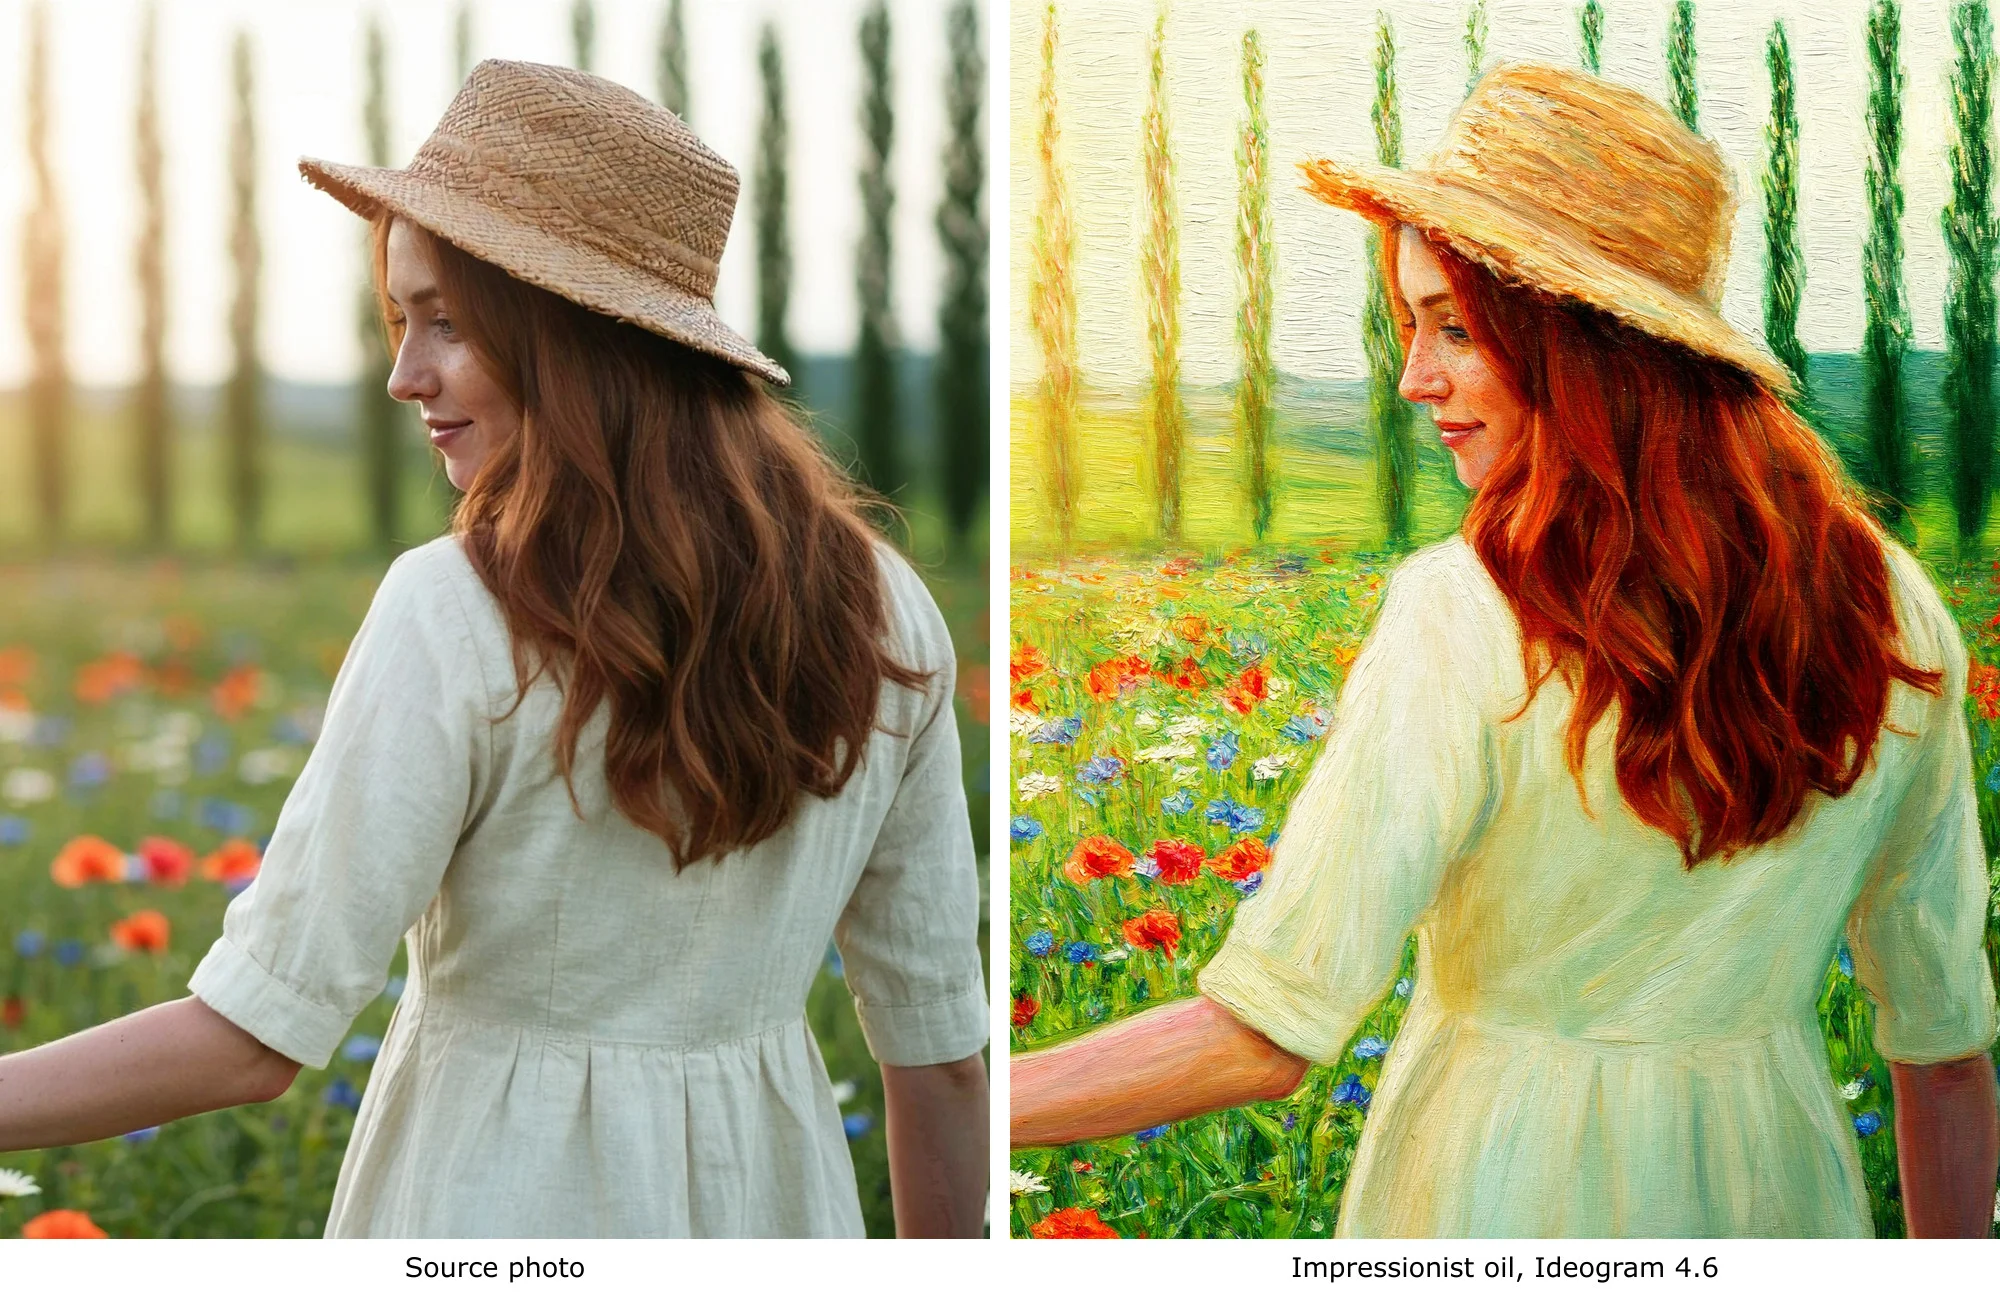
Impressionist oil for a full scene
Repaint the reference photo as a luminous impressionist oil painting on canvas: short broken brushstrokes, dabs of pure color in the wildflowers, thick paint in the highlights, a softly brushed sky, glowing golden-hour light. Keep the woman's face, auburn hair, straw hat, white dress, and pose, and keep the composition with the meadow, the hills, and the poplar trees. Hand-painted, gallery-quality, not a photograph. No text, no signature.
The poppies and cornflowers became dabs of pure color, and the dress picked up broken strokes of cream and pale green. Her pose, the hills, and the row of poplars stayed where they were.
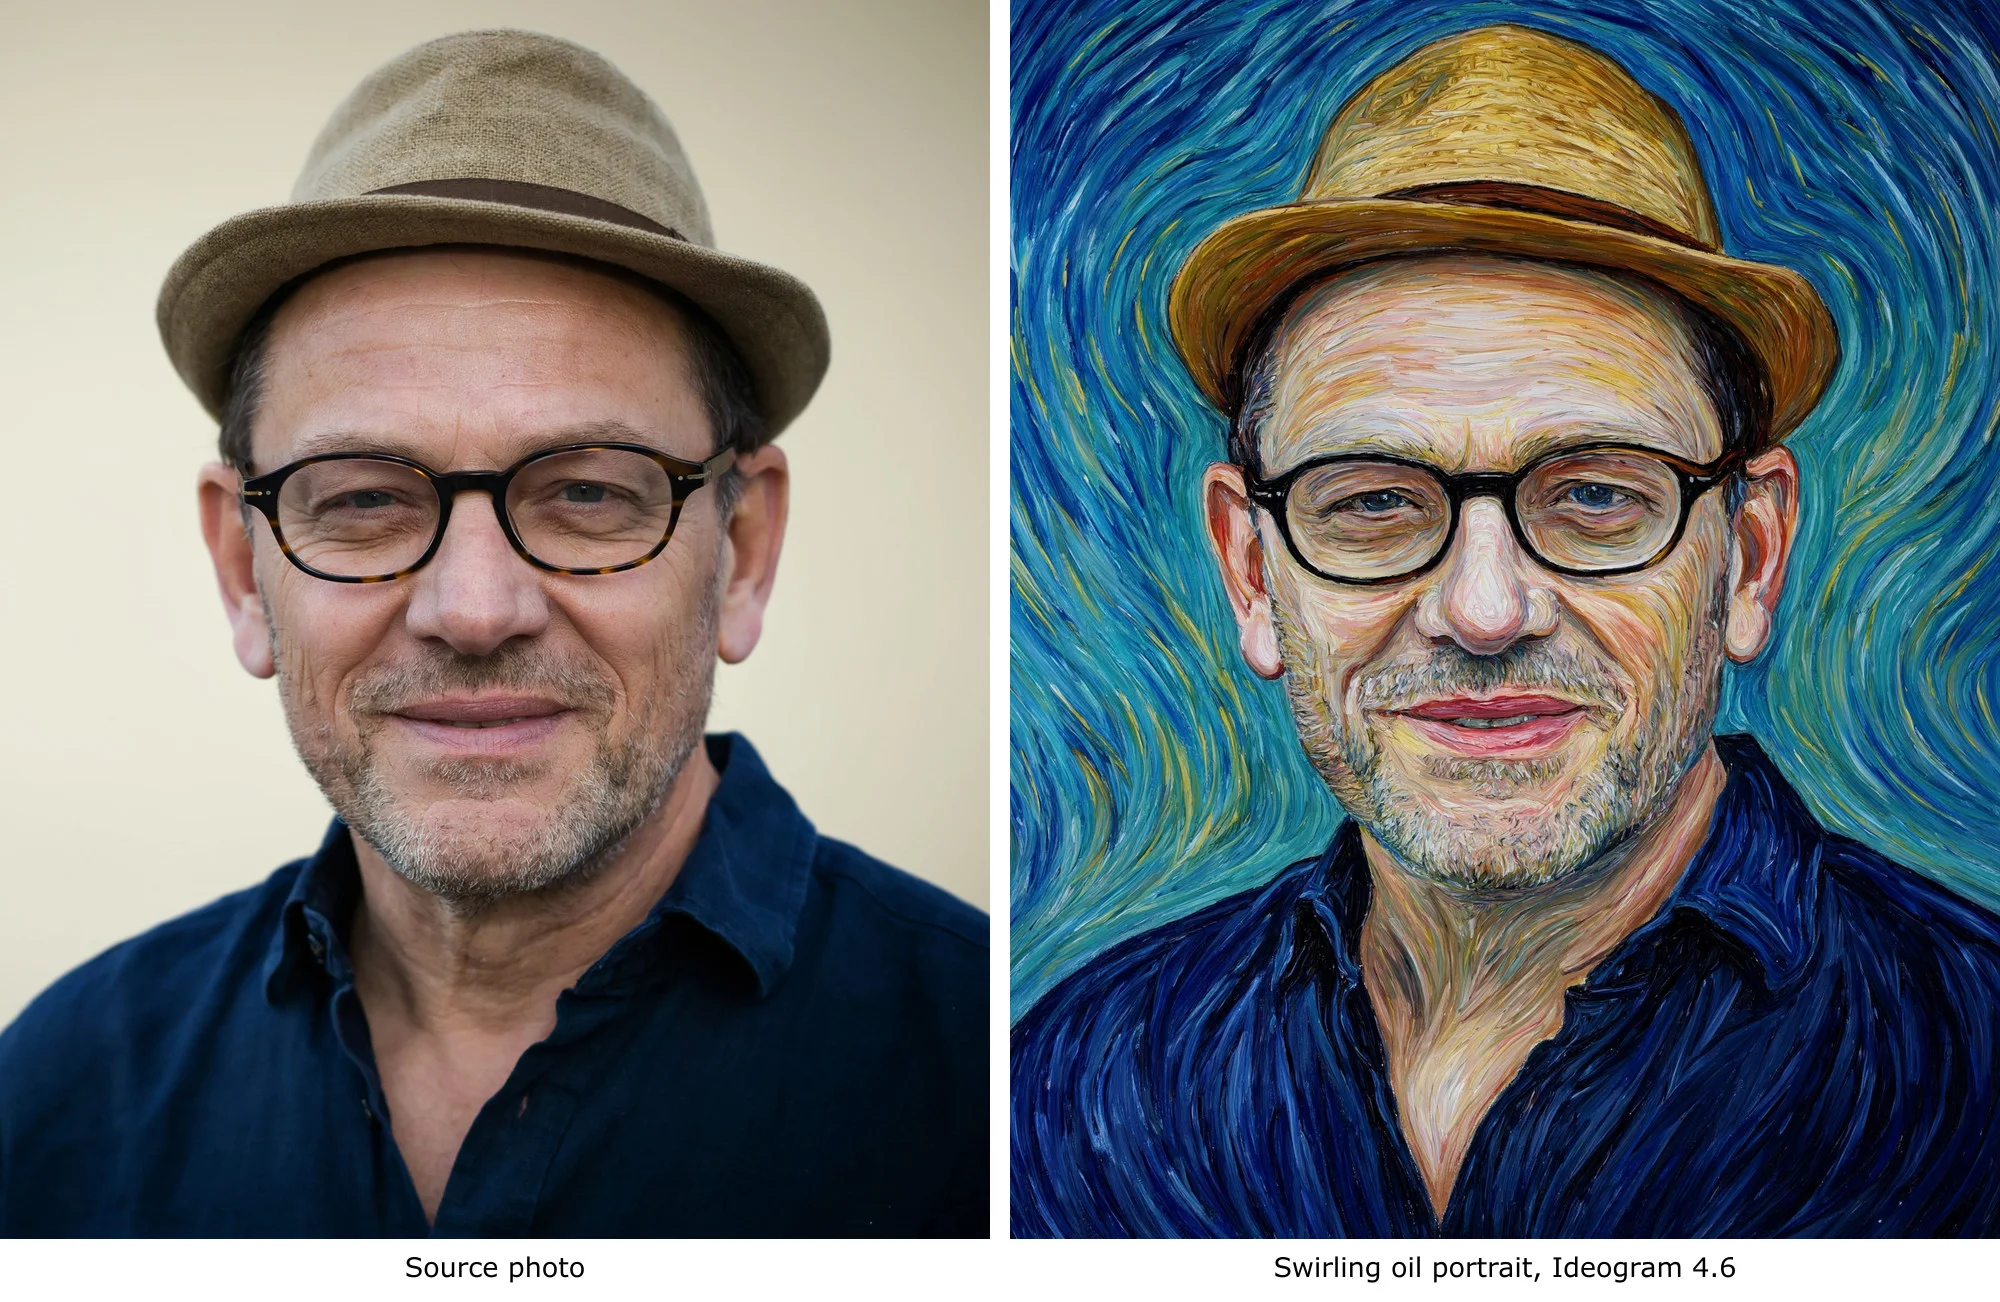
Swirling post-impressionist brushwork
Repaint the reference photo as a bold post-impressionist oil portrait on canvas: thick swirling brushstrokes, rhythmic curved strokes of deep blue, teal, and gold filling the background, visible directional strokes following the forms of the face, hat, and shirt, rich saturated color, heavy impasto. Keep his exact face, gray beard, round glasses, tan hat, navy shirt, smile, and pose so he is clearly the same man. Hand-painted, gallery-quality, not a photograph. No text, no signature.
The plain wall turned into ribbons of blue and teal, and the strokes follow the brim of the hat and the lines of his face. The glasses, the beard, and the smile are the same.
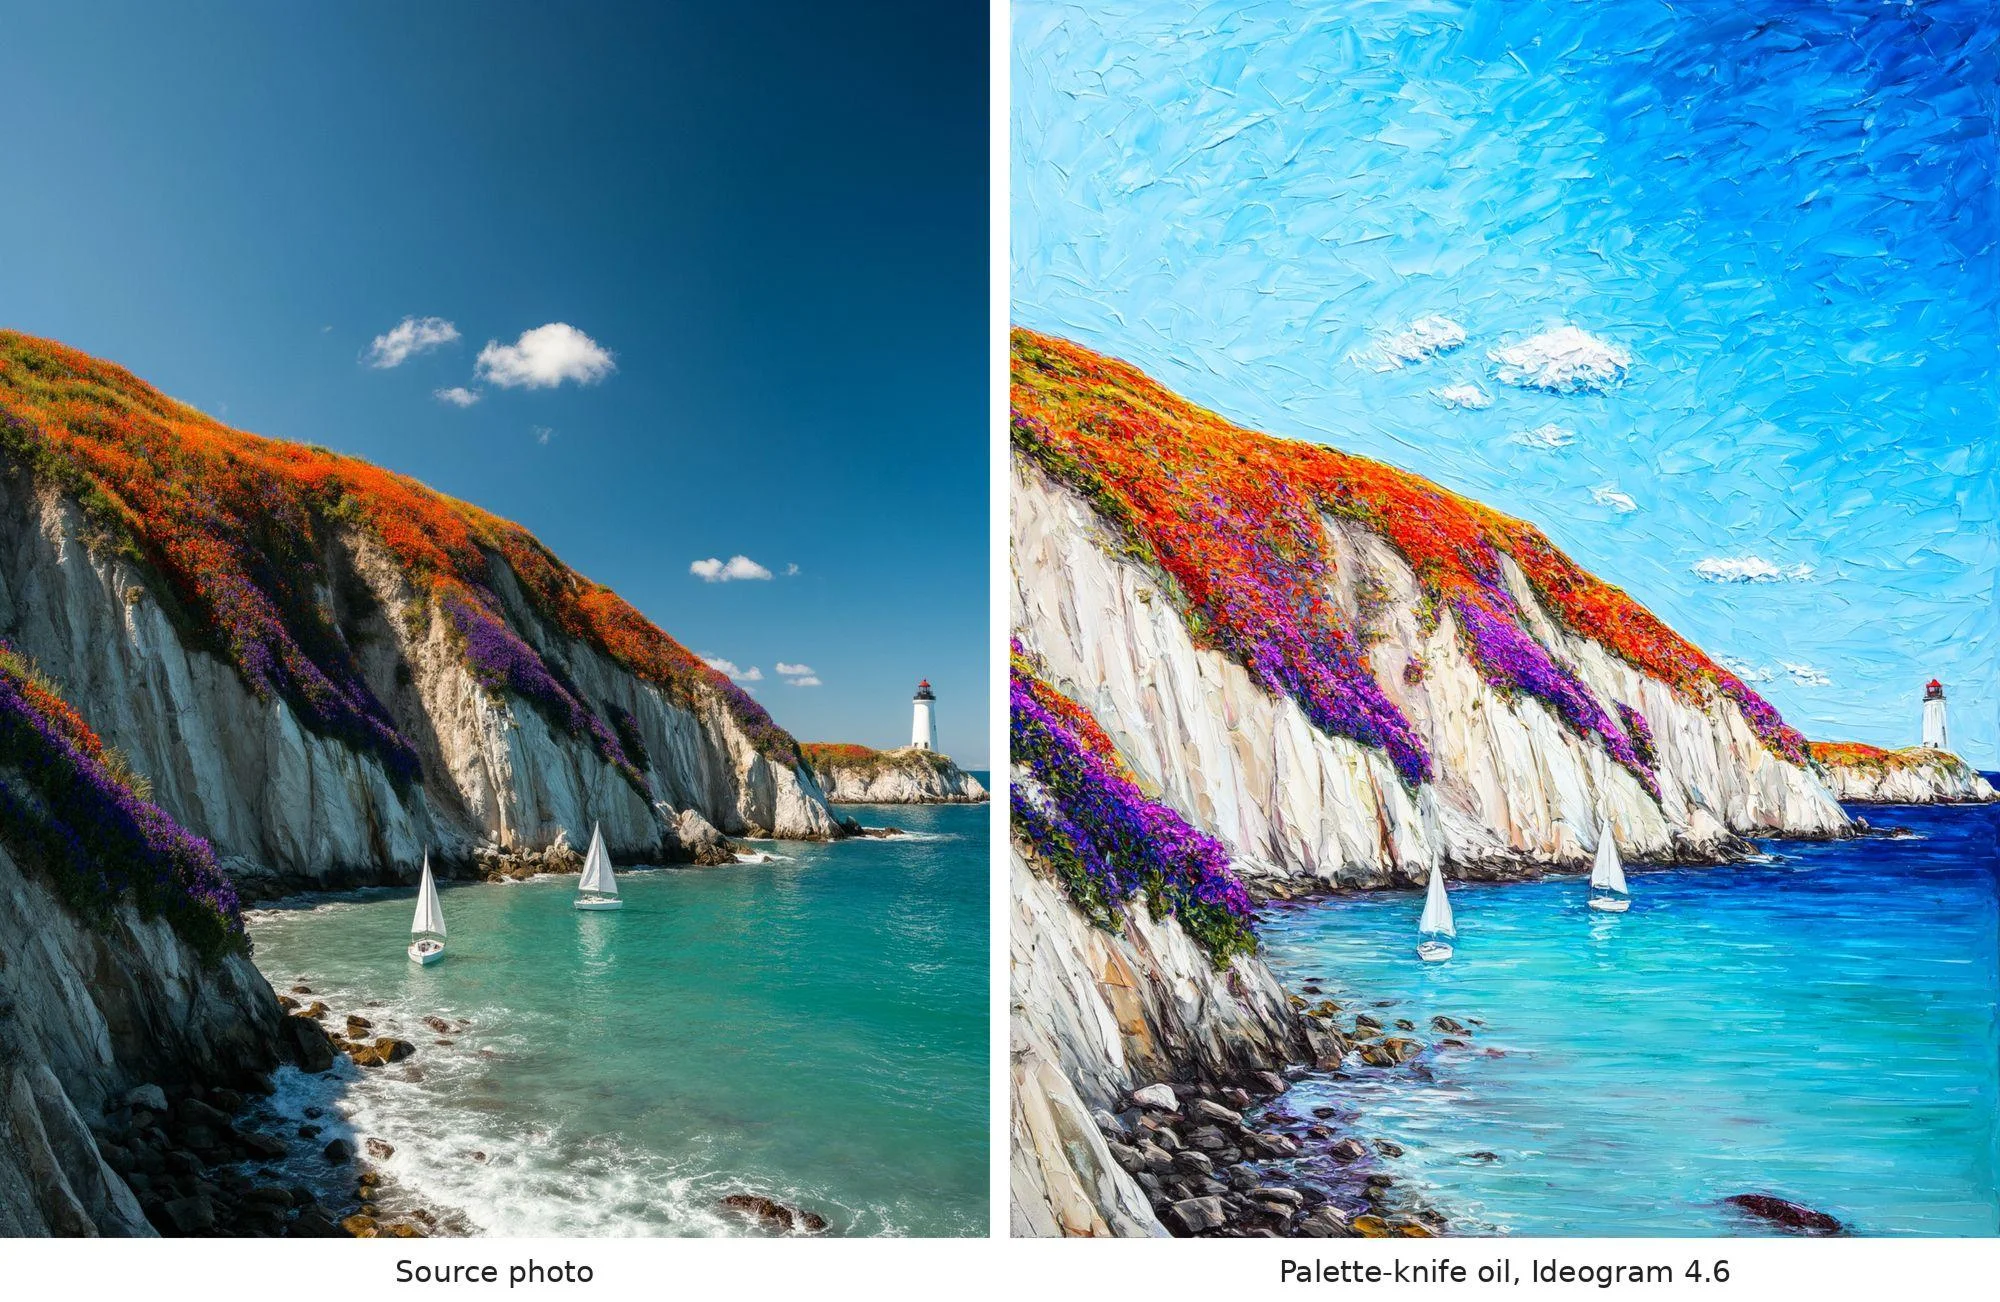
Palette-knife landscape
Repaint the reference photo as a vivid palette-knife oil painting on canvas: thick slabs of saturated color, bold strokes of orange, magenta, and violet in the wildflowers, turquoise and cobalt in the sea, crisp knife edges on the cliffs, textured impasto clouds. Keep the same composition: the cliffs, the cove, the white lighthouse, the two sailboats, and the horizon. Hand-painted, gallery-quality, not a photograph. No text, no signature.
The sky is thick knife work, the wildflowers are slabs of orange and violet, and the lighthouse and both sailboats are still in place.
Words to name for other media
| Medium | Surface | Marks to ask for |
|---|---|---|
| Acrylic | Canvas | Flat bright color, hard edges, visible layering |
| Gouache | Paper | Matte opaque color, simplified shapes, chalky texture |
| Ink | White paper | Fine pen line, cross-hatching, a single pale wash |
| Pastel | Toned paper | Soft blended strokes, visible paper tooth |
Use these words as a starting point for other media. For a preset look, start from Ideogram Styles.
Guide: Turn a photo into an illustration for brand work
For an ad, a package, or an editorial header, an illustration often fits better than paint. The method is the same: add the photo as a reference image, then name an illustration style in place of a paint medium.
Swap the first sentence of the prompt for the look you need and keep the last sentence that lists what must not change:
- Editorial illustration: “a modern editorial illustration with simplified shapes, clean edges, and a limited palette”
- Gouache illustration: “a hand-painted gouache illustration with flat matte color and soft chalky texture”
- Ink and wash: “a pen-and-ink drawing with fine line work and one pale watercolor wash”
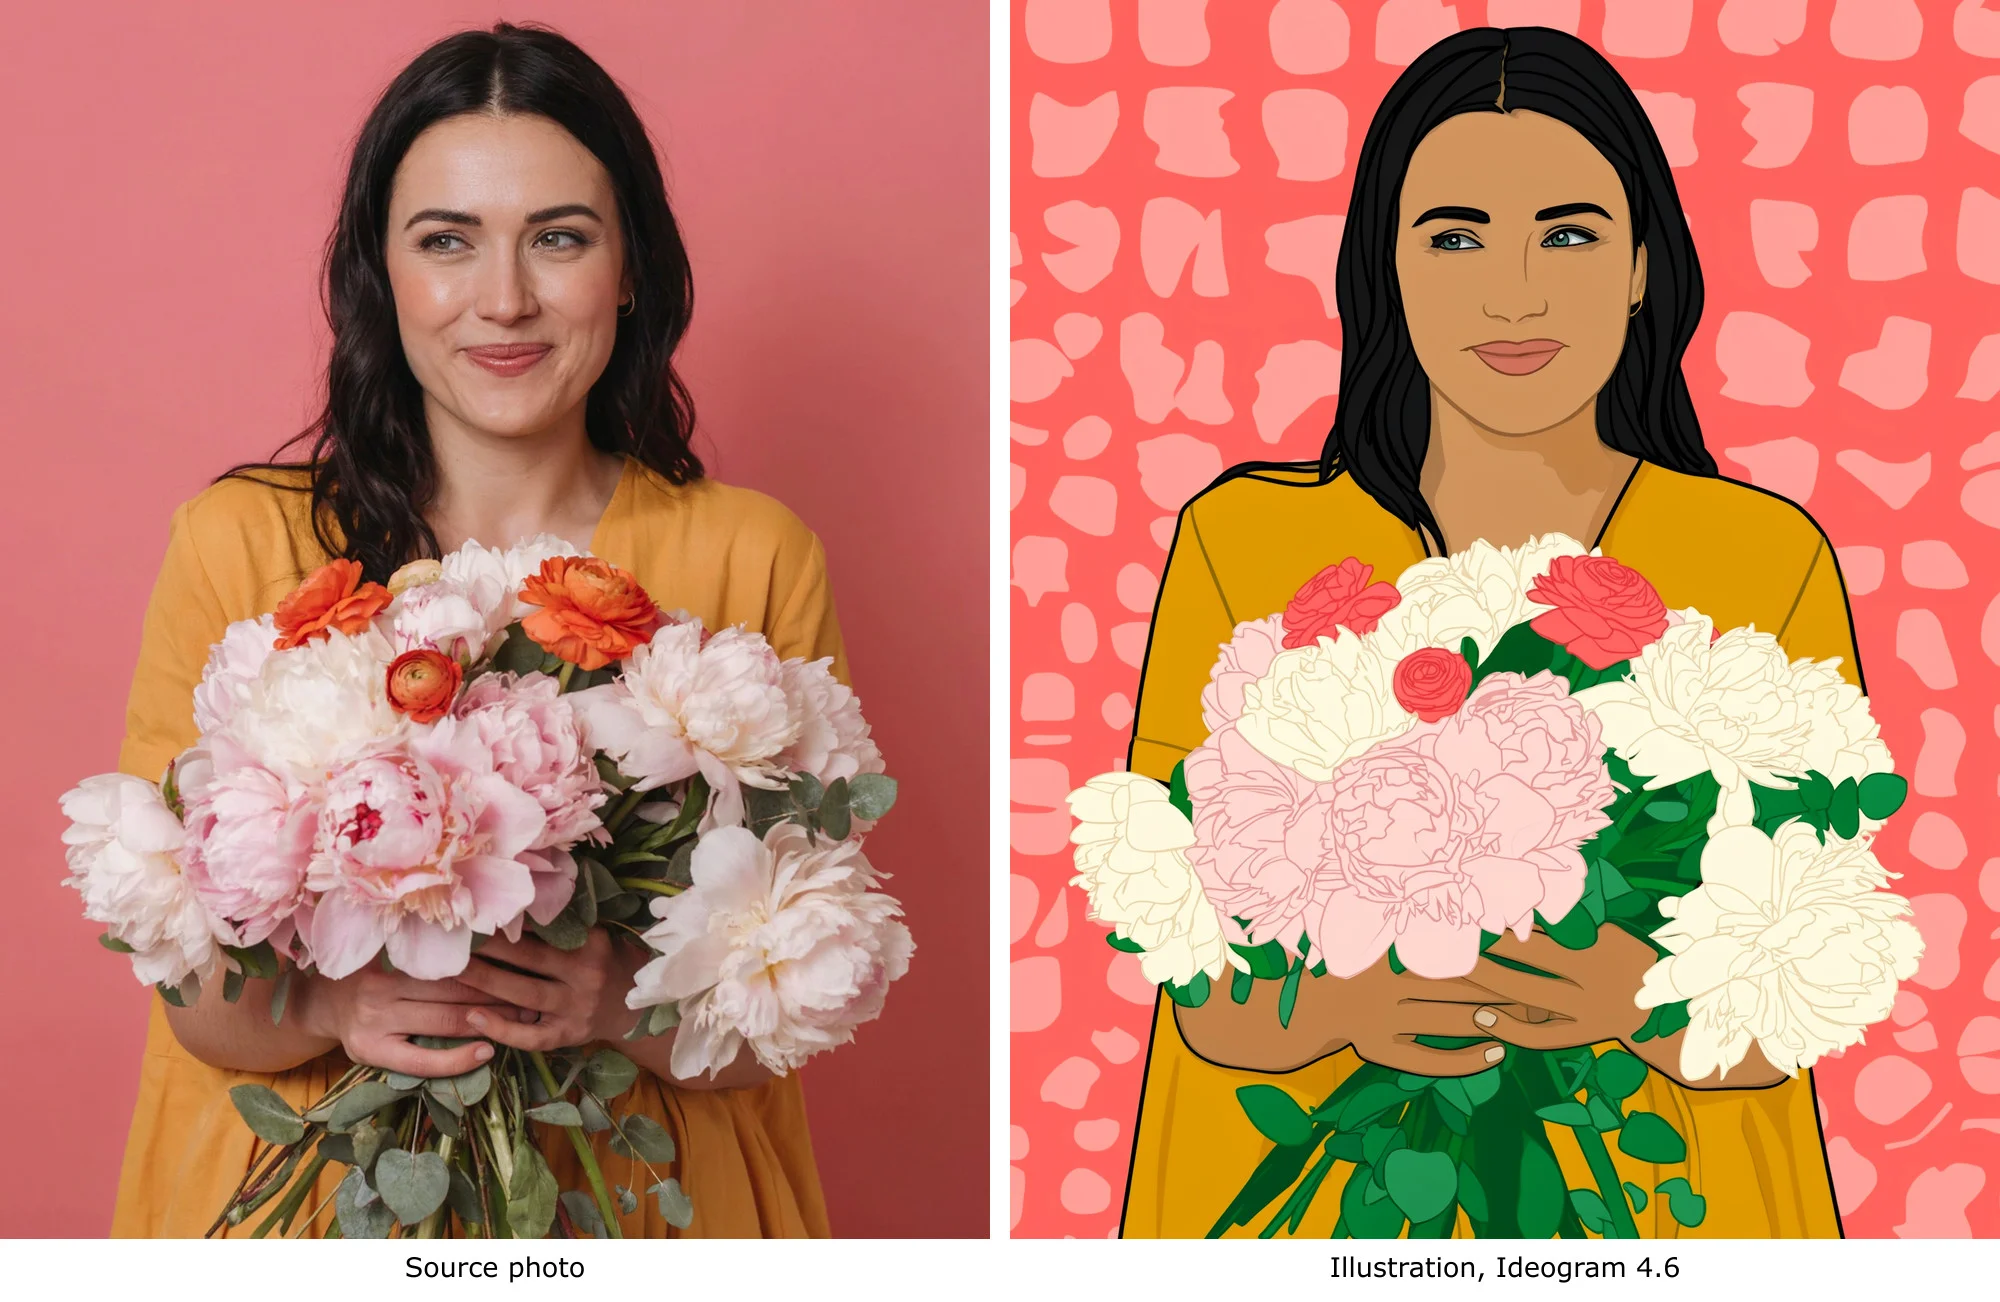
We tried it on a photo of a woman holding a bouquet:
Turn the reference photo into a bold contemporary editorial illustration: flat vibrant color, clean confident outlines, stylized decorative flowers and leaves, a simple patterned background in coral and cream, a limited palette of mustard yellow, coral pink, deep green, and cream. Keep the woman's face shape, dark wavy hair, smile, mustard dress, and pose, and keep the bouquet of peonies and ranunculus in her hands. A designed illustration, not a photograph. No text.
The result is flat color with clean outlines on a patterned coral background. The mustard dress, the dark hair, and the pink peonies carried over, and the orange ranunculus came back as pink and red blooms. The illustration also straightened her head and softened her smile. To help preserve the pose, add “same head angle and arm position” and compare the result with the source.
If the photo has words in it, such as a product label, quote them in the prompt so Ideogram’s text rendering has the exact wording to work from.
If illustration is part of your brand:
- Match a style you already use: on Ideogram 3.0, add an existing illustration as a style reference image so new images follow it.
- Keep one look across a long series: train one of our custom models on your own artwork.
- Hold the look across campaigns: we compared the tools in our roundup of AI image generators for brand consistency.
For cartoon looks, we tested the options in our guide to AI cartoon generators. Anime has its own list of AI image generators for anime.
Guide: Portraits, pets, and products: keeping the subject recognizable
The flat illustration took more freedom with the pose than the oil paintings did. The stronger the style, the more exactly you should list what must not change.
Portraits: list the features. “Keep her exact face, features, freckles, curly dark hair, expression, and pose so she is clearly the same person” held the likeness across oil, watercolor, and the classical portrait. To keep one person across many images, use character consistency.
Pets: to turn a dog photo into a painting, name the face, eyes, fur color, collar, and pose you want kept.
Products: quote the exact label text in the prompt, then check it at full size before publishing. To change a single word, you can fix a misspelled word without recreating the image. To repaint only the background and leave the product untouched, mask the area in Precise Edit.
Guide: From photo to canvas painting: sizes for printing
Our 4K portrait paintings downloaded at 3584 × 4480 pixels. Divide the pixels by the print resolution to get the size in inches.
| Print quality | Pixels per inch | Largest print from 3584 × 4480 |
|---|---|---|
| Gallery and close viewing | 300 | About 12 × 15 in |
| Wall art viewed from a few feet | 150 | About 24 × 30 in |
For a larger canvas, enlarge the file with Ideogram Upscale before you send it to the printer. If you sell prints, you can preview a design on products in our Print on Demand Studio. Our guide to AI tools for print on demand compares the options for sellers.
Reference: Photo-to-painting questions
How much does it cost to turn a photo into a painting in Ideogram?
Can I turn a photo into a painting with AI for free?
Can I sell a painting made from my photo, and who owns it?
Are the photos I upload private?
Is there an app that turns photos into paintings?
Turn your own photo into a painting
Sign up for Ideogram, add your photo as a reference image, and paste the oil prompt from step 3. Change the features in the “Keep” sentence to match your subject, choose 2K for a first try or 4K if you plan to print larger, and generate.