
6 Best AI Image Generators for Anime in 2026
A character can have the right hair, eyes, and jacket and still miss your brief. The shading might be too soft, the pose might be wrong, or the next image might give them a different face. For a recurring character, those details matter as much as the first illustration.
For an original anime character you want to place in a scene and revise afterward, Ideogram gives you generation, reference inputs, masked editing, and finishing tools in one place. PixAI offers anime-focused models and reference-led character generation. Niji Journey, NovelAI, Leonardo.Ai, and a local ComfyUI workflow offer different approaches to illustration, character direction, and customization.
We tested Ideogram 4.5 and PixAI with the same character brief, then created a rooftop scene and a jacket recolor from each original. The prompts, settings, and results are below.
Key takeaways
- Ideogram kept both boots visible in the rooftop scene and supported a targeted jacket recolor: The scene had no added border, and the masked recolor retained the surrounding character details at normal viewing size.
- The originals had different visual treatments: Ideogram produced softer, painterly shading; PixAI produced flatter color blocks and stronger outlines.
- Check accessories as closely as the face: Both rooftop edits changed the satchel. For a recurring original character (OC), compare the bag shape, badge, hair clip, and garment construction before approving a new scene.
Overview : Which AI anime art generator fits your project?
| Tool | Start here for | Access |
|---|---|---|
| Ideogram | Original illustrations and targeted revisions | Public free generations; paid privacy and additional editing |
| PixAI | Anime models, references, and cel-shaded character art | Free daily credits; paid memberships |
| Niji Journey | Anime-focused illustration and art direction | Paid web access; limited mobile trial |
| NovelAI | Detailed character prompts and scene direction | One-time image trial; subscriptions |
| Leonardo.Ai | Character concepts within a broader creative platform | Free daily tokens; paid model choice |
| ComfyUI + Animagine XL 4.0 | A configurable local anime workflow | Local software and model; hardware required |
If your project involves scene changes and clothing revisions, start with Ideogram’s editing workflow. For anime-specific model choices, explore PixAI; for prompt-led illustration and art direction, consider Niji Journey. NovelAI’s separate character prompts and positioning controls suit scenes with several characters. Leonardo.Ai combines character concepts with a broader set of creative tools. Choose ComfyUI with Animagine if you want local generation and can manage the setup yourself.
If you also create product photos, posters, or other illustrations, our guide to free and paid AI image generators covers tools for those projects.
Overview : How we tested: one character, a scene change, and a recolor
We ran three tasks in each tool: generate an original character, place that character in a rooftop scene, and recolor the original jacket. Each tool used its own generated character for the edits. Both edits started from the original standing image.
Original character prompt: We used this brief in both tools, without a reference image.
Create a full-body anime character illustration of an original adult female sky courier, age 25. She has amber eyes, a chin-length dark teal bob with blunt bangs, and one white triangular hair clip above her left temple. She wears a mustard-yellow cropped jacket with navy cuffs over a cream high-neck shirt, navy cargo trousers, brown ankle boots, and a small burgundy crossbody satchel. A silver crescent-shaped badge is pinned to her jacket.
She stands facing the viewer in a relaxed three-quarter pose, arms resting naturally at her sides, both hands visible. Show her entire body, including both boots, with empty space above her head and below her feet.
Clean hand-drawn anime linework, flat colors, crisp two-tone cel shading, adult proportions, restrained highlights. Plain pale-gray background, evenly lit. One character only. No text, logos, borders, or additional panels.
What we checked: We reviewed shading and linework, eye and hair color, clip placement, clothing and accessory construction, hands, and full-body framing. After each edit, we compared the result with that tool’s original character.
Ideogram
PixAI
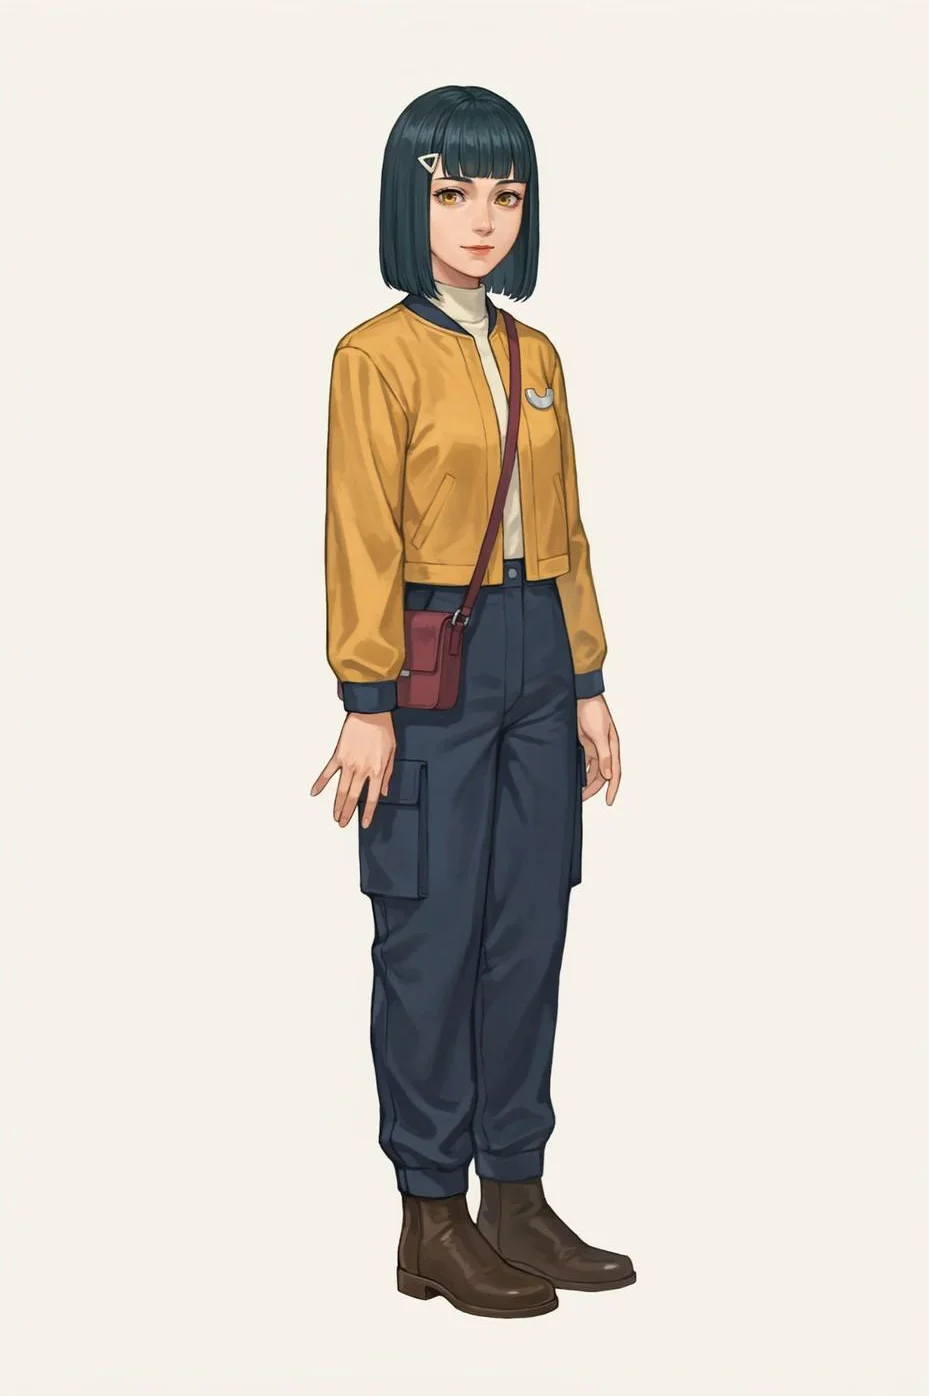
Ideogram included the main outfit details and kept the boots inside the frame. The illustration had soft, painterly shading. For the requested cel-shaded treatment, we’d refine the color blocks and shadow edges in the next version. For accessory placement, specify the side from the viewer’s perspective, for example, “above her temple on the viewer’s right.”
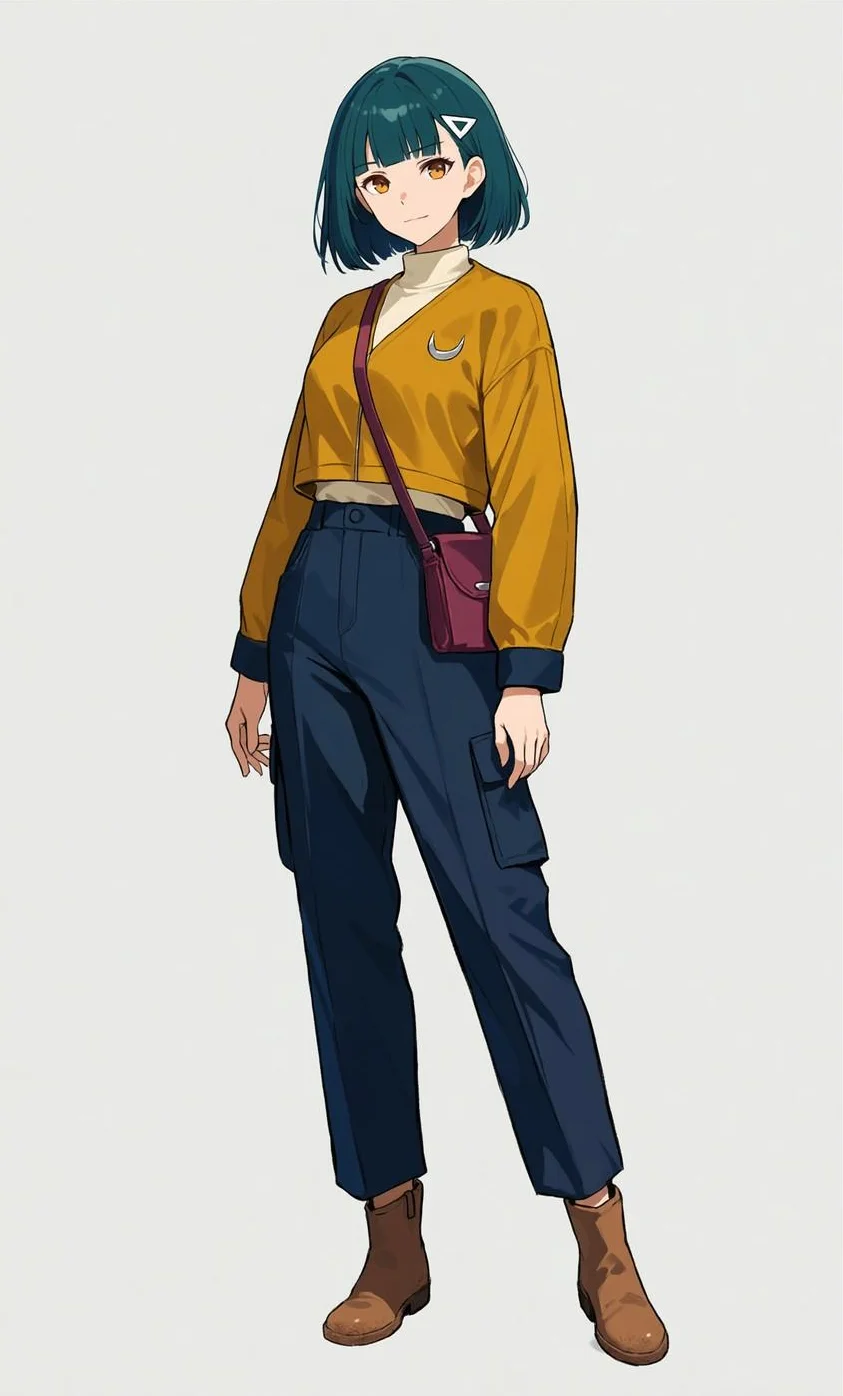
PixAI used flatter color blocks and stronger outlines. It placed the clip on the character’s left and gave the jacket a looser fit with a V-shaped opening. The fingers on the viewer’s left looked crowded. If you’re designing a costume, check the garment’s cut as closely as the shading.
Ideogram settings: We used Ideogram 4.5 at High quality with a 2:3 aspect ratio and Magic Prompt off. One image was quoted at 10 credits, and the file measured 1365 × 2048 pixels.
PixAI settings: We used the Tsubaki.3 model with Single, XL, 3:5, and High Priority settings. The image cost 4,400 credits and measured 1104 × 1824 pixels.
Credits aren’t comparable across platforms, so compare subscription prices and how many revisions each plan covers.
Tool 1 : Ideogram: Create anime illustrations and refine specific details
Choose Ideogram when you want to develop an original character into a finished illustration and make specific revisions along the way. In our test, the rooftop scene kept the courier recognizable, with both boots visible and no added border. A separate masked recolor changed the jacket to green while keeping the face, pose, and accessories visually stable.
Both edits started from the same original, so we could assess the scene change and recolor separately.
Move your character into a new scene
We opened the original character in Precise Edit and requested a walking pose on a rooftop at sunset. Her right hand needed to hold a sealed cream envelope, her face needed to turn toward the viewer, and both boots needed to remain visible.
Rooftop edit prompt: We used the same scene instruction for both tools.
Show the same adult sky courier from the reference image walking across a rooftop delivery platform at sunset. Use a three-quarter side view, with her face turned toward the viewer. Her right hand holds a sealed cream envelope at chest height; her left arm hangs naturally at her side. Both boots are fully visible.
Preserve her facial identity, amber eyes, dark teal bob, blunt bangs, triangular hair clip on the same side as in the reference, mustard jacket with navy cuffs, cream shirt, navy cargo trousers, brown boots, burgundy satchel, and silver crescent badge. Keep the reference image’s illustration style.
Include rooftop railings, distant buildings, and a softly glowing evening sky. One character only. No text or additional panels.
Original
Rooftop scene
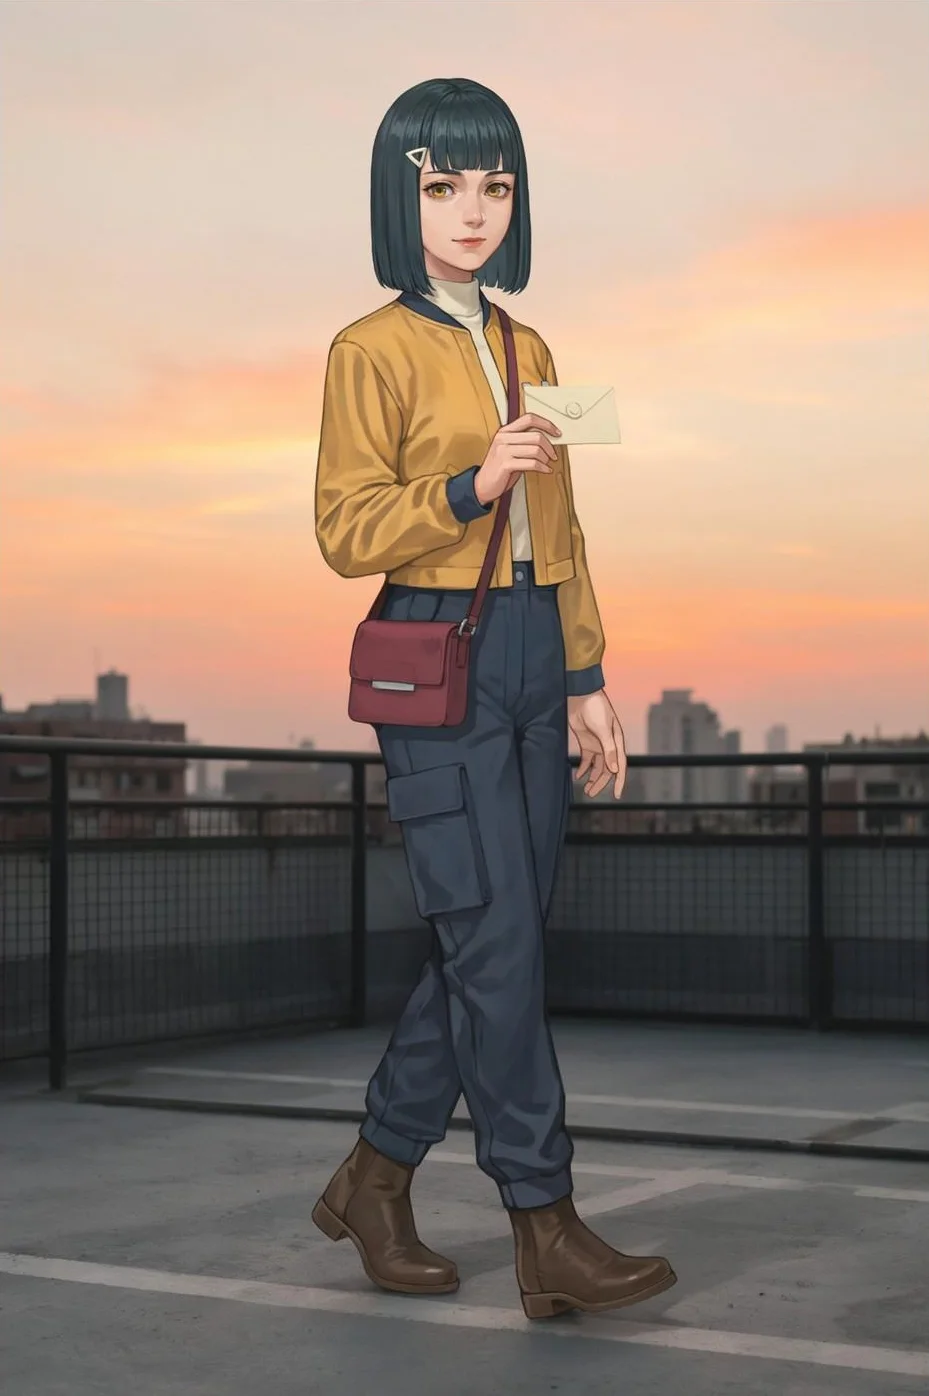
Scene result: The result kept the teal bob, blunt bangs, amber eyes, clip, and clothing palette recognizable. It added the requested rooftop and envelope. Both boots remained visible.
The satchel became larger, with a different flap and clasp. The pose was nearer a front three-quarter view, with the envelope partly covering the badge. For the next revision, we’d supply the original as an accessory reference and specify the bag shape and side-on camera angle. Keep an approved reference that shows those details clearly.
Reference inputs: You can also use reference images to guide a new illustration. In the Image app, Ideogram 4.5 accepts up to five images for editing or combining. In Precise Edit, the source goes in Image; you can add up to four additional references without a mask, or three with one. Ideogram 3.0’s separate style references guide visual treatment.
Change the jacket without rebuilding the scene
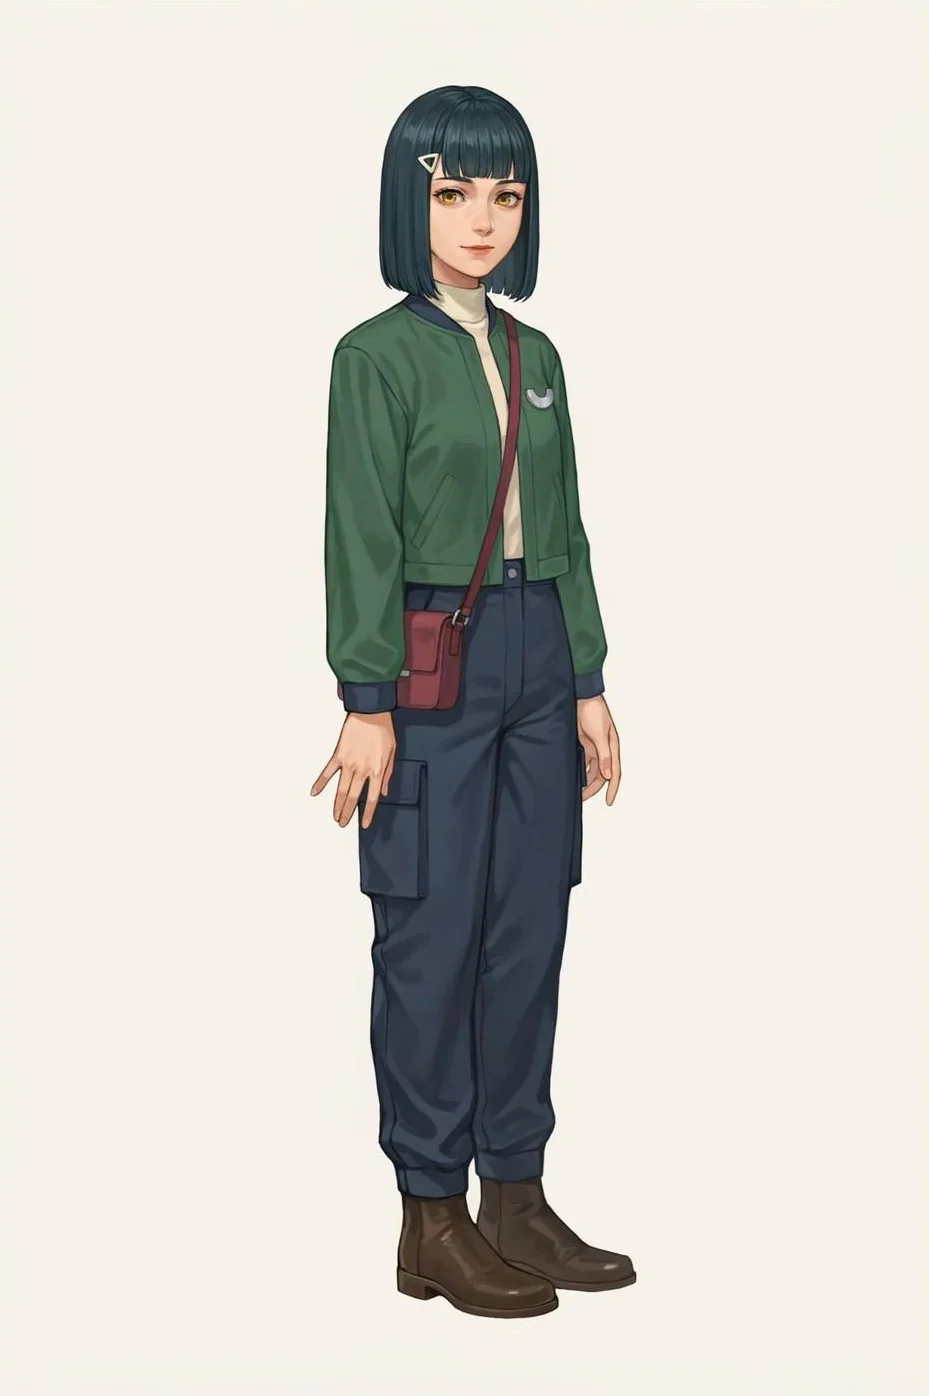
For the recolor, we returned to the original standing character. In Precise Edit, we selected areas of the jacket and requested muted forest green, keeping the navy trim and remaining artwork unchanged. The interface quoted six credits.
Recolor prompt excerpt: With the jacket fabric selected, the color instruction was:
Change only the mustard-yellow jacket fabric to muted forest green. Keep the navy cuffs and collar trim unchanged. Preserve the jacket’s seams, folds, shading, and silver badge.
Original
Green jacket
Recolor result: The jacket changed color. At normal viewing size, the face, hair, pose, badge, satchel, and plain background looked preserved.
For larger illustrations, Precise Edit also has a context-window workflow: it edits an area up to 2K and leaves everything outside that window untouched.
Once you’ve approved the character, a masked recolor lets you explore another outfit color without requesting a new composition. Select the fabric you want changed, keep the trim and overlapping accessories out of the selection where possible, and specify what should stay. Our step-by-step image editing guide shows how to write revision prompts and inspect the results using a product example.
Add lettering and prepare a larger export
Beyond the edits shown here, you can prepare the illustration for a cover or poster. For a title or caption, Studio supports text layers and Layerize Text, which turns detected lettering into editable text. Proofread names and dialogue, and check that the text fits after changing its size or wording.
If you need a larger file, the Upscale app offers named models and supported 2×, 4×, or 8× scales. Enlargement can alter details, so inspect the eyes, clip, outlines, and badge afterward. Our image upscaler comparison explains how to assess those changes.
Free access and privacy: Eligible free accounts receive a variable weekly allowance, and free-plan generations are public. Free accounts also receive limited Precise Edit access; further edits require a paid plan or purchased credits. Reference inputs use priority credits.
Paid access and cost: Plus is $20 billed monthly or $180 billed annually, equivalent to $15 per month, with 2,400 monthly priority credits and private generation. Subscription credits expire each cycle; purchased top-up credits roll over. Check the Ideogram plans and credit allowances against the work you expect to do.
Approve the character’s linework, shading, and accessories before moving into scenes. Keep that original beside each revision, then use a selection for changes such as the jacket recolor shown above.
Tool 2 : PixAI: Explore anime models and reference-led variations
PixAI fits creators who want an anime-focused model library and tools for developing original characters. Its Tsubaki.3 documentation covers reference generation and natural-language editing. Community checkpoints (image-generation model files) and LoRAs (small trained model adapters that guide a character or style) offer additional choices. Check that an adapter works with your chosen model and that its license covers your project.
Our original courier had strong outlines and relatively flat shading, matching the cel-shaded direction in the brief.
Reuse the character through Smart Reference
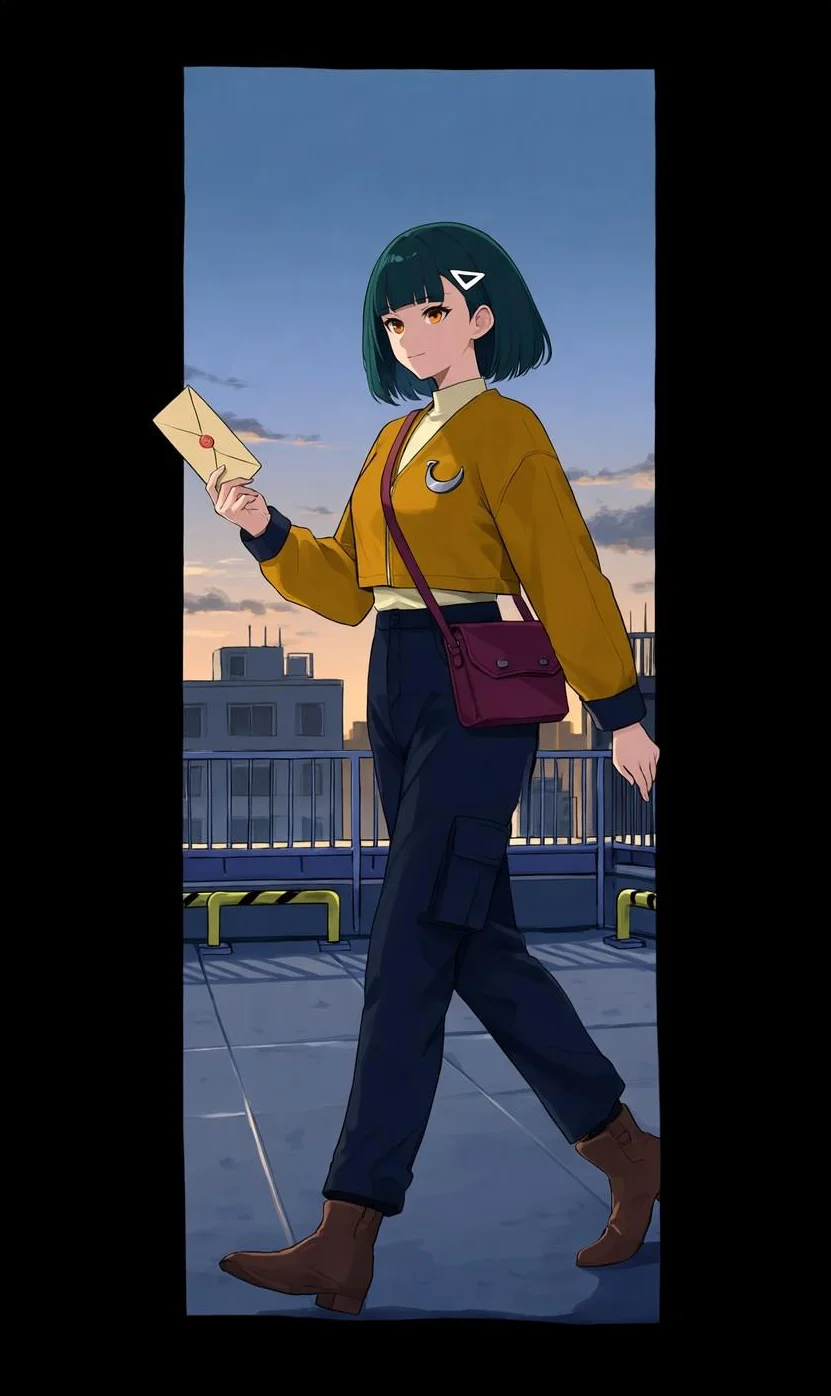
We selected Smart Reference on the original PixAI image, then replaced the generation prompt with the rooftop edit prompt shown in the Ideogram section. We used the original PixAI character as the reference. PixAI quoted 5,300 credits for the scene.
Original
Rooftop scene
The teal hair, amber eyes, clip, badge, and outfit colors remained recognizable. The image included a walking pose, envelope, rooftop railings, and an evening sky.
The satchel’s shape and fasteners changed. A large black border appeared, and the rear boot was partly cut off at the right edge of the illustrated scene. For a full-body character asset, that framing would need correction. Cropping off the border wouldn’t restore the missing part of the boot.
Make a prompt-based recolor
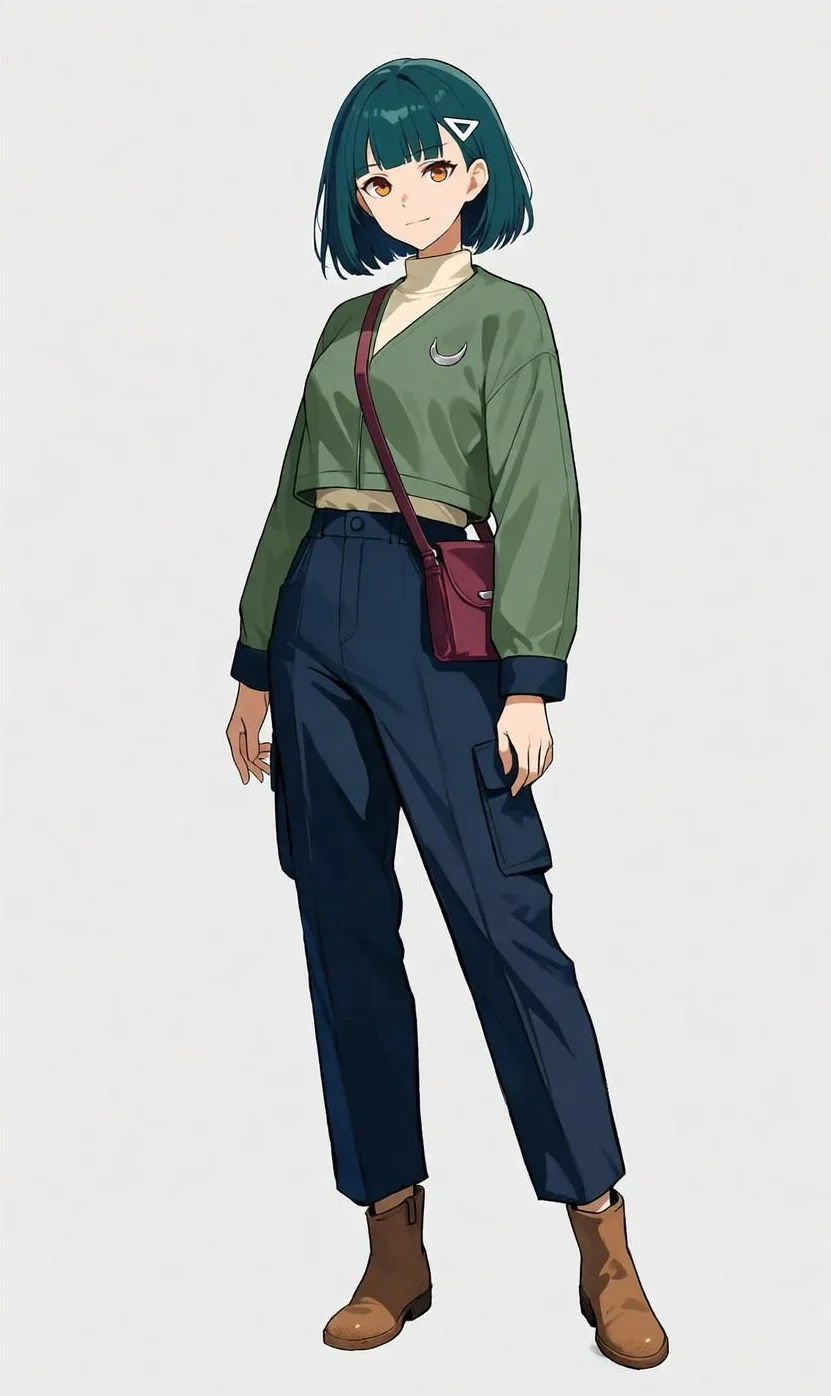
We returned to PixAI’s original standing image, attached it as a reference, and requested a muted green jacket while retaining the remaining details. We didn’t apply a mask.
Standing-character recolor prompt:
Change only the mustard-yellow jacket fabric to muted forest green. Keep the navy cuffs unchanged. Preserve the jacket’s shape, seams, folds, shading, and silver crescent badge. Keep the character’s face, hair, hair clip, pose, hands, cream shirt, burgundy satchel, trousers, boots, and plain background unchanged.
Original
Green jacket
The cuffs stayed navy, and the badge, face, hair, satchel, pose, and background remained visually similar. This recolor used an unmasked reference workflow, while the Ideogram recolor used a selection around the jacket fabric.
Downloaded files: The original download was WebP at 1104 × 1824. Both edited files were PNG at 1088 × 1824. We saw no visible watermark on these samples.
Free credits and membership: PixAI offers 10,000 claimable daily free credits; membership adds credits and tools. Its documentation lists Starter at $9.99 monthly, while checkout may display promotional annual offers.
Before training a character LoRA, check the supported model architecture. Choose a LoRA that matches your generation model, and check its commercial-use conditions before using it for commissions.
Tool 3 : Niji Journey: Explore anime-focused illustration and art direction
Niji is Midjourney’s anime-focused model family, developed with Spellbrush. Niji 7 supports original illustrations, backgrounds, and key visuals directed through prompts and visual references.
Controls: Niji 7 accepts image prompts, with image weight controlling their influence. Use a style reference for linework, color, and rendering rather than character identity. Midjourney’s older Character Reference supports Niji 6. Omni Reference is restricted to Midjourney V7, rather than Niji 7.
Before subscribing for a recurring character project, try your character with the exact model and reference workflow you plan to use.
Access: Basic costs $10 monthly. Standard costs $30 and includes relaxed image generation. Stealth Mode requires Pro or Mega, starting at $60 monthly for Pro. There is no free website or Discord trial; a limited trial is available in the Niji mobile app.
Client work: Midjourney applies commercial terms, including a Pro or Mega requirement for company use by businesses grossing more than $1 million annually. Choose Pro or Mega if your unreleased character work needs Stealth Mode.
Tool 4 : NovelAI: Direct anime scenes with detailed character prompts
NovelAI suits creators who want anime-specific generation with detailed character descriptions, tags, and scene controls. It supports natural-language prompting as well as tag-based direction, so you can describe a scene in sentences and use tags for specific details.
Character positioning: V5 supports separate character positioning and up to 22 character prompts. For a cast scene, start with two characters and check whether their faces, clothes, and positions stay distinct before adding more.
Reference compatibility: Precise Reference works with V4.5 only. Vibe Transfer is incompatible with Precise Reference. If the project depends on an approved character image, check that compatibility before choosing the newer model by default.
Access: The one-time trial provides 30 images up to 1024 × 1024 after account verification. Subscriptions start at $10 monthly. Paid output sizes depend on the generation settings.
Privacy and downloads: NovelAI says image requests, uploads, edits, and generations aren’t stored on its side. Save your outputs using its download control; its FAQ warns that session images can be lost and that some saving methods omit settings metadata. NovelAI doesn’t claim ownership of generated images, but you’re responsible for checking your intended use.
Tool 5 : Leonardo.Ai: Develop character concepts with image guidance
Leonardo.Ai puts anime character concepts alongside other illustration and concept-design workflows. Its character tools accept descriptions and reference images; the platform also offers personal models and editing options.
The main decision is which model you’re using. Some workflows use image inputs with written instructions, while others expose separate guidance controls. Choose a model with the reference or pose controls your character brief needs.
For a game concept, settle the silhouette and clothing first, then request a new angle. Compare the face, costume construction, and accessories before treating those images as a character sheet.
Free access and privacy: Free accounts receive 150 daily fast tokens, Auto-only model access, basic quality settings, and public creations.
Paid access: Essential is $12 monthly before tax, with 8,500 monthly fast tokens, broader model access, private creations, and personal models.
Commercial use: Free users receive a non-exclusive, royalty-free commercial license under Leonardo’s terms; paid users have different ownership provisions. For an unreleased character, public output and limited model selection may matter more than the daily allowance.
Tool 6 : ComfyUI with Animagine XL 4.0: Build a configurable local anime workflow
ComfyUI is the interface. Animagine XL 4.0 is an anime-focused SDXL checkpoint you can run through it. The distinction matters: changing the checkpoint, pose-conditioning model, or LoRA changes both the workflow and the permissions you need to review.
This route suits creators willing to configure generation, keep model files, and troubleshoot their own setup. Compatible pose-conditioning workflows can use structural guidance rather than relying on a written pose alone. Training a character LoRA is a separate step that requires a suitable dataset and training workflow.
Hardware and setup: ComfyUI supports Windows, Linux, and macOS, including Apple Silicon. Its Windows desktop guidance recommends an NVIDIA or AMD GPU. Memory needs depend on the checkpoint, resolution, and extra models loaded. Check the requirements for the full workflow, including any pose or reference models you add.
Model limits: Animagine XL 4.0’s model card warns that text rendering isn’t supported, multiple-character scenes need care, and pushing resolution above its training range can degrade results. For dialogue, plan to add editable lettering in a separate layout tool.
Costs and permissions: Local generation avoids a hosted per-image subscription, but hardware, electricity, storage, and setup still cost something. Animagine XL 4.0 uses CreativeML Open RAIL++-M, which allows commercial use subject to its conditions. Other checkpoints and adapters can have different licenses. Review the checkpoint and each adapter you load.
Reference : How to choose a tool for your next anime project
Separate character identity from visual style
Style is the treatment: outlines, shading, palette, and texture. Identity is the person: facial proportions, hair silhouette, markings, and defining accessories. A set of images can share a style and depict different-looking people.
For a recurring OC, make a short checklist before you generate: eye color, bangs, accessory side, jacket construction, bag shape. Our two scene tests kept the courier recognizable but changed the satchel. That’s why a face-only check isn’t enough.
Match the control to the revision
Use a reference when you want to bring an approved design into a new composition. Use a mask when the image is already right and only a specific area needs work. Consider compatible custom training when you’ll reuse a character often enough to justify preparing a dataset.
In Ideogram, custom-model training is a separate workflow from the 4.5 edits shown here. Self-service training uses an Ideogram 3.0 base, takes 15–100 images, and requires Pro for personal-space training or Team for team-space training. Check the base model before planning references and edits. For a shared illustration library, our guide to maintaining a consistent visual identity explains when training is worth the preparation.
A seed helps reproduce settings within a compatible workflow. It isn’t a portable identity code across different models or changing compositions.
For a character sheet, inspect the front, side, and back views individually. Make sure a strap connects, a badge stays on the intended side, and the outfit remains the same garment. For manga panels, also check reading order and dialogue. Review character continuity across the full chapter, including panels generated separately.
Check the exported file and the intended use
Open the actual download at the size you plan to use. Check the outline, hands, eye shape, and small accessories. Record pixel dimensions instead of relying on a preview label such as XL or 2K. PNG supports transparency, but a PNG with a solid background isn’t a cutout.
For posters or merchandise, work backward from your printer’s required dimensions. An 8 × 12-inch illustration at 300 PPI needs 2400 × 3600 pixels; changing a file’s PPI label alone doesn’t add detail. Our guide to preparing artwork for print-on-demand covers transparent artwork, print dimensions, and final export checks.
For a client commission or game asset, review commercial permission, privacy, and the rights to your references. Permission to use generated output doesn’t automatically clear an existing franchise character or grant exclusivity. Our AI image licensing comparison explains the different questions to ask.
Reference : Frequently asked questions
What are the best free AI image generators for anime?
PixAI offers daily claimable credits, while Leonardo.Ai has daily tokens with limited model access and public creations. Ideogram offers eligible accounts a variable weekly allowance and limited Precise Edit access, with public free-plan generations. NovelAI offers a one-time image trial. Compare whether the allowance covers your next revision as well as the first generation.
How do you keep an original anime character consistent?
Start from an approved image and use the written description to reinforce its defining details. Use a compatible character-reference or editing workflow, then inspect the face, hair, clothing, and accessories in each result. In our tests, the character stayed recognizable through the scene edits; check accessories such as bags and badges in each result. Custom training can help with repeated use, provided the adapter matches the model.
Can you use AI-generated anime art commercially?
Several services permit commercial use under their terms. Ideogram allows commercial use of generated images; other providers apply their own plan and model conditions. Community checkpoints and LoRAs need individual license checks. You also need appropriate rights to source images and any protected characters or branding in the work.
Can an AI anime generator turn a photo into anime?
Tools with image inputs can restyle a photo through reference-led generation or editing. Describe the treatment you want and the features that should remain recognizable. Check facial shape, hair, glasses, and expression in the result.
Create your character, then revise it
Create your first character in Ideogram, then open the result in Precise Edit to try a scene change or a clothing revision. Keep the original beside each result so you can choose the version that fits your illustration.
For a studio evaluating a shared house style, custom training, or production integration, talk to our enterprise team with approved artwork and a brief that shows the details your team needs to preserve.